Hide or show a UI element
Understand how you can hide or show a UI element after a set time delay.
Read time 1 minuteLast updated 18 hours ago
Use this example to understand how to hide or show a UI element after a set time delay.
Create a button in your UI Canvas
- Select UI Canvas in the Hierarchy panel.
- Right-click and choose UI > Button to create a new button.
Hide the button by default
- Select the button in the Hierarchy panel.
- In the Inspector panel, uncheck the checkbox next to the button's name to hide the button by default.
Create a New Logic script
- In the Project panel, select the My Logic folder.
- Select Add (+).
- Select Script. Unity Studio creates a new Logic script in the folder.
- Enter a name for your script and press Enter.
Add the script to a GameObject in your scene
- Select or create a GameObject from the Hierarchy panel.
- From the Inspector panel, select Add Component.
- Choose your Logic script from the list.
Set up the logic in the Logic Editor
- In the Project panel, double-click the Logic script to open the Logic Editor.
- Drag a When event listener into the Logic Editor.
- Add a Play Starts event inside the When node. This triggers the logic when the application starts.
- Drag a Wait node inside the When node.
- Set the Wait value to seconds. This adds a delay.
3 - Create a new variable for the Button, and set its type to Object.
- Expand the button variable properties and methods.
- Drag the Set Active method into your logic chain, and set it to true.
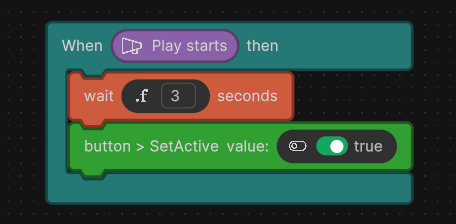
Example Logic script to show a UI element after a delay.
- Close the Logic Editor.
Connect your Button reference
- In the Hierarchy panel, select the GameObject that has your Logic script attached.
- Drag your button from the Hierarchy into the Button variable reference in your script component.