カスタム ID を使用してサインインする
Sign in users to Vivox with custom identifiers.
読み終わるまでの所要時間 7 分最終更新 8ヶ月前
既存のプレイヤー管理システムがすでにあり、プレイヤー ID を作成している場合は、カスタム ID プロバイダーを使用してアイデンティティをリンクできます。
前提条件:
- Unity Cloud プロジェクトを設定する
- プロジェクト ID、環境 ID、環境名を確認してください。
- UAS カスタム ID プロバイダーを有効にする この設定のサービスアカウントの認証情報をご用意ください。
この設定のすべてのフロー
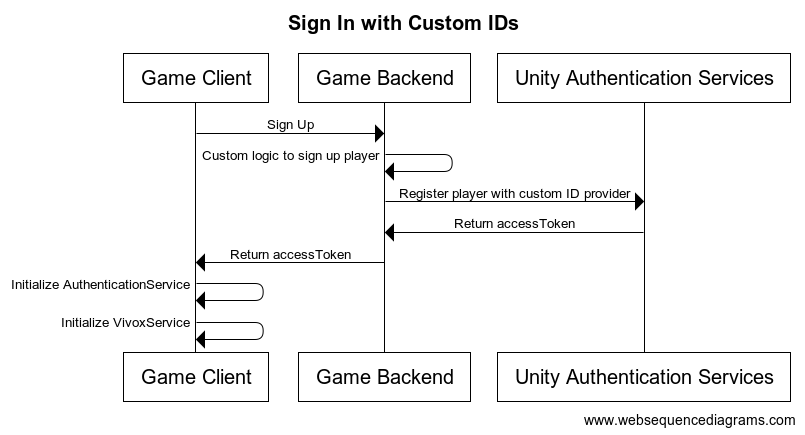
サインインする
- サインインの際にすべてのユーザーを UAS カスタム ID プロバイダーに登録し、プレイヤーの と
accessTokenを取得します。sessionTokens - と
accessTokenを使用してクライアントに AuthenticationService を設定しますsessionToken
クライアント側の設定
さらに後で説明するサーバー側でのサインインの設定と合わせて、アクセストークンをバックエンドから取得して で処理する必要があります。
AuthenticationServiceProcessAuthenticationTokensProcessAuthenticationTokensProcessAuthenticationTokensusing Unity.Services.Authentication;using Unity.Services.Vivox;void SignUserWithCustomTokenWithAutoRefresh(){ try { // Check if a cached player already exists by checking if the session token exists if (AuthenticationService.Instance.SessionTokenExists) { // This call will sign in the cached player. await AuthenticationService.Instance.SignInAnonymouslyAsync(); Debug.Log("Cached user sign in succeeded!"); } else { var userTokens = // Fetch the user tokens using your method calls AuthenticationService.Instance.ProcessAuthenticationTokens(userTokens.AccessToken, userTokens.SessionToken) } // Shows how to get the playerID Debug.Log($"PlayerID: {AuthenticationService.Instance.PlayerId}"); await VivoxService.Instance.InitializeAsync(); } catch (AuthenticationException ex) { // Compare error code to AuthenticationErrorCodes // Notify the player with the proper error message Debug.LogException(ex); } catch (RequestFailedException ex) { // Compare error code to CommonErrorCodes // Notify the player with the proper error message Debug.LogException(ex); } catch (Exception ex) { // Handle exceptions from your method call Debug.LogException(ex); }}
サンプルコードはメソッドのみであり、クラスではありません。
アクセストークンはバックエンドから取得する必要があります。この詳細については、以下の サーバー側の設定 を参照してください。
サーバー側の設定
プレイヤーのサインイン時に、各プレイヤーが UAS カスタム ID プロバイダーに登録されるようにし、プレイヤーの と を取得します。まだ行っていない場合には、UAS カスタム ID プロバイダーを有効にする を参照して設定してください。サービスアカウント認証情報を使用して、プレイヤーをゲームサーバーに登録するリクエストを送信できます。
accessTokensessionToken- トークン交換 API を呼び出して、ステートレストークンを取得します。
- カスタム ID を使用したサインインの API を呼び出します。
curl --location 'https://player-auth.services.api.unity.com/v1/projects/<PROJECT_ID>/authentication/server/custom-id' \--header 'Content-Type: application/json' \--header 'UnityEnvironment: <ENVIRONMENT_NAME>' \--header 'Authorization: Bearer <STATELESS_TOKEN' \--data '{ "externalId": "YOUR_CUSTOM_PLAYER_ID"}'
このリクエストのレスポンスに含まれる と を、 を初期化するためにクライアントに返す必要があります。このコンテキストでは を として使用できます。
idTokensessionTokenAuthenticationServiceidTokenaccessToken任意ですが、プレイヤー名 API を使用してプレイヤーの名前を設定することもできます。これは、Vivox Safety 製品を使用している場合に役立ちます。Moderation ダッシュボードでモデレーターに対してプレイヤー名を表示できるためです。プレイヤーが名前を変更する場合にプレイヤー名を最新状態に保つようにしてください。プレイヤー名の管理 を使用してクライアント側からプレイヤー名を直接管理することもできます。