Texture Editor
How to manage textures in Asset Transformer Studio using the Texture Editor
Read time 1 minuteLast updated 9 hours ago
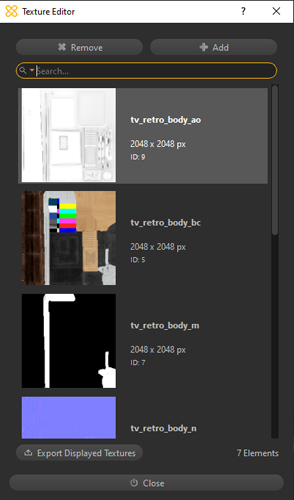
The Texture Editor allows you to manage the textures of the scene. It is accessible from the Materials menu.
These textures can be used by the materials of the scene. Through the Texture Editor, textures (or maps) can be imported or exported. It also displays textures created through the Baking function.
Item | Description |
|---|---|
| Add Button | Opens a browser to import a texture file (image) in the scene. Note: Supported image formats: PNG, JPEG, BMP, TIFF and TGA. |
| Remove Button | Removes the currently selected texture from the scene. All objects that used the removed texture will appear gray in the viewport (exported without material). |
| Texture List | Lists all the textures available in the scene. By default, the list is empty. When importing a 3D file, all textures from the imported file are added to the list. When baking textures, they are listed in the Texture List. |
| Search Bar | Filters the Texture List to textures whose name contains the typed text string. |
| Export Displayed Textures button | Exports all the textures listed in the Texture List to the chosen folder (right-click to export only selected textures). Note: Textures exported from the Texture Editor are exported as 8-bit PNG files. |
| Right-click menu in the Texture List | Allows you to export all textures from the Texture List (equivalent to the Export Displayed Textures button). |
| Textures List Selection | Multiple textures can be selected using the CTRL key. |
| Right-click menu on Selection | Allows you to export all selected textures to the chosen folder. |
| Close button | Closes the Texture Editor. |