Sign in with Custom IDs
If you already have an existing player management system that creates player IDs, you can use the Custom ID provider to link the identities.
Important: Only use this flow if the Authentication package setup doesn't work for your use case and you want to link players to your custom player ID.
Prerequisites:
- Set up a Unity Cloud project
- Make sure you have your project ID, environment ID, and environment name.
- Enable the UAS custom ID provider Make sure you have your Service Account credentials handy from this setup
The overall flow of this setup:
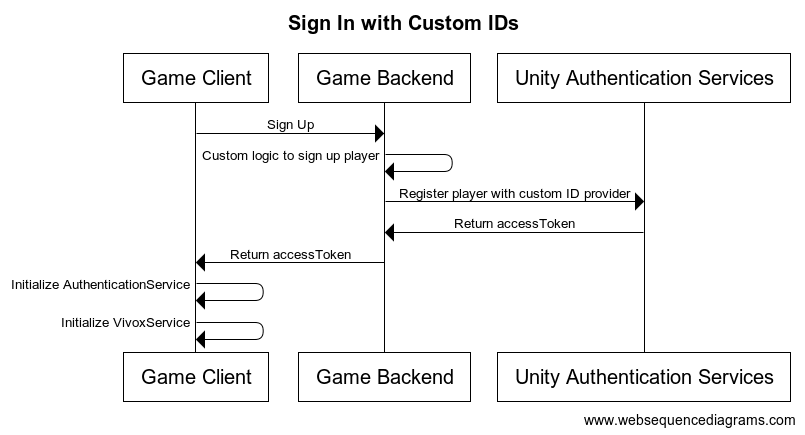
Sign in flow
- The game client sends the sign in request to the game back end
- The game back end either signs in the player using your custom logic or registers the player with a custom ID provider sent to UAS.
- UAS returns an access token to the game back end.
- The game back end then returns the access token to the game client.
- The game client then initializes the authentication service and the Vivox service to finish signing in the player.
Sign in steps
- Register all users with the UAS custom ID provider on sign-in and retrieve
accessTokenandsessionTokensfor players. - Set up the AuthenticationService in the client using the
accessTokenandsessionToken
Client-side setup
Together with the server side sign in set up, an access token has to be retrieved from your back end
and processed with the AuthenticationService:
ProcessAuthenticationTokens is used to process Unity Authentication Service Access Tokens and make them available to other UGS SDKs integrated into the game that require the player to be authenticated.
Since the access tokens expire you must manually refresh the access token and call ProcessAuthenticationTokens with the new access token.
You can call ProcessAuthenticationTokens with both the access token and the session token. The Unity Authentication SDK refreshes the access token before it expires, keeps the player's session active, and enables sign in a cached player.
using Unity.Services.Authentication;
using Unity.Services.Vivox;

void SignUserWithCustomTokenWithAutoRefresh()
{
    try
    {
        // Check if a cached player already exists by checking if the session token exists
        if (AuthenticationService.Instance.SessionTokenExists)
        {
            // This call will sign in the cached player.
            await AuthenticationService.Instance.SignInAnonymouslyAsync();
            Debug.Log("Cached user sign in succeeded!");
        }
        else
        {
            var userTokens = // Fetch the user tokens using your method calls
            AuthenticationService.Instance.ProcessAuthenticationTokens(userTokens.AccessToken, userTokens.SessionToken)
        }
        // Shows how to get the playerID
        Debug.Log($"PlayerID: {AuthenticationService.Instance.PlayerId}");

        await VivoxService.Instance.InitializeAsync();
    }
    catch (AuthenticationException ex)
    {
        // Compare error code to AuthenticationErrorCodes
        // Notify the player with the proper error message
        Debug.LogException(ex);
    }
    catch (RequestFailedException ex)
    {
        // Compare error code to CommonErrorCodes
        // Notify the player with the proper error message
        Debug.LogException(ex);
    }
    catch (Exception ex) {
        // Handle exceptions from your method call
        Debug.LogException(ex);
    }
}
Note that the sample code is a method only, not a class.
The access token needs to be retrieved from your backend. Refer to the Server-side setup below for more information on that.
Server-side setup
During player sign-in, ensure that each player is registered with the UAS custom ID provider and retrieve a accessToken and sessionToken for the player.
If you haven't done it yet, refer to Enable the UAS custom ID provider to set it up.
Using the Service Account credentials you can send a request to register a player on your game server:
- Call the Token Exchange API to retrieve a stateless token.
- Call the Sign In With Custom ID API:
curl --location 'https://player-auth.services.api.unity.com/v1/projects/<PROJECT_ID>/authentication/server/custom-id' \
--header 'Content-Type: application/json' \
--header 'UnityEnvironment: <ENVIRONMENT_NAME>' \
--header 'Authorization: Bearer <STATELESS_TOKEN' \
--data '{
    "externalId": "YOUR_CUSTOM_PLAYER_ID"
}'
The response of this request will contain an idToken and a sessionToken that you have to return to the client for initializing the AuthenticationService.
The idToken can be used as the accessToken in this context.
Optionally, you can use the Player Names API to set a name for the players. This is useful if you are using the Vivox Safety products as it will allow the player names to be displayed to moderators in the Moderation dashboard. Make sure you keep the player name up to date if players change it. You can also directly manage player names from the client side using Player Name Management.