Link your dashboard project to a Unity Editor project.
Initialize UGS in your game code.
Sign up
To use Push Notifications, you need to sign up for Unity Analytics, which is part of Unity Gaming Services (UGS). For more information about Analytics pricing, refer to UGS pricing.If you don't have a Unity account, create one and create a new project to sign up for Unity Gaming Services.
To use the Unity Push Notifications service, you’re required to link your project to a cloud project in the Unity Editor through a project ID. Follow these steps to get your project ID.
In the Unity Editor menu, go to Edit > Project Settings to open the Services tab.
If you’re not already signed in with your Unity ID, either create a new Unity ID or sign in.
If you want to create a new project, select your organization and select Create. If you want to link to an existing project, select I already have a Unity Project ID.
Select your organization and project from the dropdown, and select Link.
You can find your project ID from the Settings tab in the Services window.
Integration
Note
The Push Notifications SDK supports both iOS 10+ and Android SDK >= 26 (Oreo).
Summary of the integration steps:
Integrate the SDK: Integrate package, register for Push Notifications, and enter settings/keys.
Upload keys: Locate and upload private keys (Firebase & Apple) to the Unity Dashboard.
Test integration: Send a test notification to your device to ensure integration is correct.
Create notification campaign: Create and schedule your first notification on the Unity Dashboard.
1. Integrate the Push Notifications SDK
Install the Push Notifications SDK
Note
The Push Notifications SDK might not be visible by default inside the Package Manager in your Unity Editor version.
You can install the Push Notifications SDK inside your Unity Project in one of three ways:
1. Import using the Unity Registry
Open your Project Settings from Edit -> Project Settings.
Select Component > Package Manager.
Under the Packages dropdown, select Unity Registry.
Select Install in the top right.
2. Import by name
Open the package manager through Component > Package Manager.
Select the Add (+) button in the top left to add a new package and select Add package by name.
Type in com.unity.services.push-notifications as the Git URL and add.
3. Import using the "manifest.json" file
Copy the following code snippet and adjust the package version:
"com.unity.services.push-notifications": "4.0.1"
Go to the root of your project folder in the file explorer, then go to the package folder
Packages/manifest.json
.
Add the copied code at the end of the
manifest.json
file and append a
,
at the end if needed.
Register for Push Notifications
To receive Push Notifications, your app needs to register for Push Notifications. Follow Registering for Push Notifications for details.
2. Upload your service keys
To send notifications from the Unity Gaming Services dashboard, you need to upload service keys from Firebase for Android and from your Apple Developer account for iOS.
Google
You need a Firebase Service Account Key to be added to your Unity project settings before sending notifications to Android devices. This needs to be done for every UGS environment of the game that you expect to test or use notifications with.
Go to Project Settings and select Service accounts at the top.
Select Create service account.
Select Generate new private key.
Select Generate key to download the key file.
In the Unity Dashboard, select Products > Push Notifications > Settings then go to Google Keys and select the
Add Key
or Edit Icon in the "Google Key" row.
You will be asked to return to the Editor to complete the
Configure the SDK
step.
In the Editor navigate to Project Settings > Services > Push Notifications and configure your Android (Firebase) Settings.
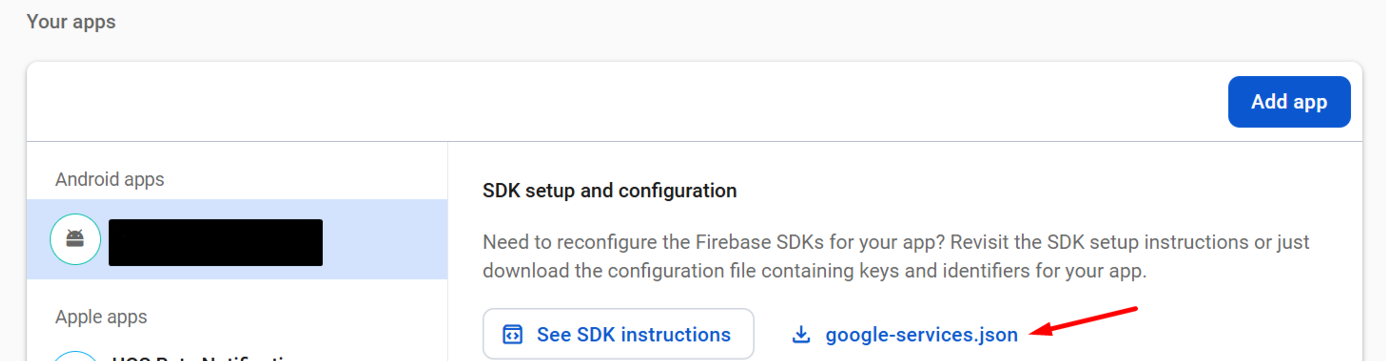
Firebase Web API Key: Found in Project Settings > General > Your Apps > google-services.json. Open this file and copy the API Key into your editor settings.
Firebase Project Number: Located at Settings > General > Your Project > Project Number.
Firebase App ID: Located at Settings > General > Your apps > App ID.
Firebase Project ID: Located at Settings > General > Your Project > Project ID.Return to the Dashboard and select the Next button to move to the next step in the Google Key configuration wizard.
9. Upload the private key created in the previous steps and select Finish.
Note
For security reasons this file won’t be visible if you re-enter the edit settings page.
Apple
You need to add an Apple key, project, and account details to your Unity project settings before sending notifications to Apple devices. You can reuse the same Apple key between games, environments, and development and production builds in the Unity Dashboard (go to step 8 if you already have one). This needs to be done for every UGS environment of the game that you expect to test or use notifications with.
Go to the Certificates, Identifiers & Profiles page and select Keys.
Select + to create a new key.
Name your key and enable the Apple Push Notifications service (APNs) option to enable notifications, then select Continue. Note, you can only enable this capability on two keys per account.
Select Register on the next page to confirm.
Download the generated key and make note of the Key ID provided as you’ll need it later. You can only download the key file once; it needs to be revoked and regenerated if lost.
Go to Player Engagement > Notifications > Settings for your project in the Unity Dashboard, click the
Set Up Keys
link in the Setup banner at the top, then select
Add Key
or the Edit Icon in the "Apple Key" row.
There are five fields that need to be populated:
Key: Upload the key created in the previous steps.
Key ID: This is provided when you registered the key and can also be retrieved by selecting the key in the Apple Developer console.
Team ID: This is your team ID displayed under your account name on the Apple Developer console.
Topic ID: Populate with the bundle identifier for your game. It needs to exactly match the one in “Identifiers” in the “Certificates, Identifiers & Profiles” page in your Apple Developer console.
Sandbox: If you want to message players from a development/debug build of your game, set the sandbox value to True. If you want to message users on a production build, set to False.
Select Finish. For security reasons this file won’t be visible if you re-enter the edit settings page.
The Mobile Notifications package has been imported into your project as a dependency of Push Notifications. In the Editor navigate to Project Settings > Mobile Notifications and select the iOS section. Make sure
Request Authorization
,
Enable Push Notifications
and
Register for Push Notifications on App Launch
options are checked.
Refer to the Mobile Notifications documentation for more information on configuration and the additional features offered by this package.
When building the application within XCODE, ensure that the app is given the Remote Notification capabilities so it can receive notifications.
The Signing and Capabilities page shows that the Remote notifications checkbox is enabled under the Background Modes section.
You’ll receive the following error message at runtime if you fail to do this:
Failed to register for remote notifications: no valid “aps-environment” entitlement string found for application