CCD in the Unity Cloud Dashboard
You can use Cloud Content Delivery (CCD) in the Unity Cloud Dashboard to create and maintain buckets, entries, badges and releases. You can also view helpful metrics concerning downloads and instances of errors related to your Cloud Content Delivery usage.
As an example scenario, you can use the Unity Cloud Dashboard to interactively manage an application’s assets using a more visual user interface than the CLI provides.
To access CCD in the Unity Cloud Dashboard:
If you already have a project, go to the next step. Otherwise, if you are using Unity services for the first time:
- Create a Unity ID account (if you don’t already have one).
- Log into the Unity Cloud Dashboard.
- Click the projects dropdown, then Create project. In the Create project window, fill in the required details.
From the Unity Cloud Dashboard, select Products > Cloud Content Delivery.
Click Buckets.
Select the project you want to use with CCD from the projects dropdown.
By default, the production environment should be selected. However, you can switch environments using the Environments dropdown at the top of the Buckets page. We encourage our users to have at least a production and a development environment.
Buckets
In the Cloud Content Delivery page for your project, you need to create buckets to host your content.
To add a bucket:
Click Create Bucket.
In the Create Bucket window, give the bucket a name and an optional description.
Specify whether you want to restrict write access to this bucket. Choose between:
- Open to all: Anyone can modify content in this bucket.
- Promotion only: Owners and managers can modify content through promotion from another bucket. No one can directly upload to or delete content from this bucket.
To restrict read access to this bucket, select Enable Bucket Privacy. Private buckets only allow users with an access token to read the content.
You cannot change the bucket privacy settings after you create the bucket.
You can select the environments in which you want your bucket to be created. You can specify different privacy and write access settings for each bucket.
If the environment you’re in doesn’t have any buckets, but you have another environment with buckets, you can duplicate your buckets' setup from that environment by selecting Copy from Environment.
Then, in the dialog, take the following steps:
- Select the Environment from which you want to duplicate the buckets' setup using the Source Environment dropdown.
- Select Next.
- Select the buckets you want to duplicate (this duplicates the bucket with its settings, but it won’t duplicate its content).
- Enable the confirmation checkbox.
- Select Finish.
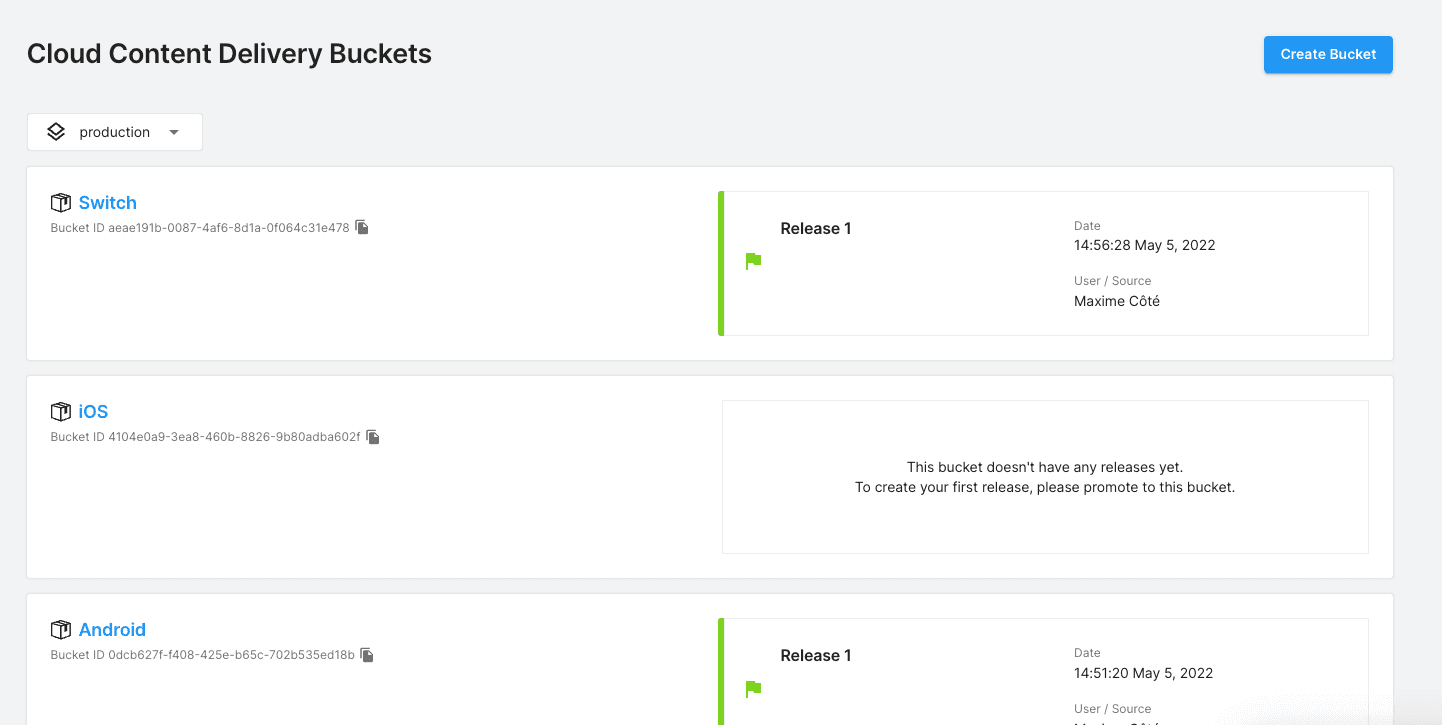
In the bucket list view, you can see the selected environment at the top, and then a list of all buckets from that environment. Each bucket has a details row that contains the following information:
The bucket name
An icon with a tooltip indicating whether the bucket is open to all (open box icon) or eligible for promotions only (closed box icon)
The Bucket ID
If the bucket is Private, a label with a closed lock image and the text "Private Bucket"
The description of the bucket
A snapshot of the current state.
- The release number of the current release, or notification of unreleased changes.
- The date at which the last change was made to the bucket.
- The user name of the person who made the latest changes, or the name of the source for automated changes.
For more information about a bucket, select its name in the list view. In the bucket details screen, there are the following tabs:
Latest: Shows the current state of the bucket, and the latest versions of all its content. From here, you can create a release. The asset list is paginated, searchable, and contains a filter. If your bucket does not have any unreleased changes, you can move a release from this bucket to another using the Promote Release button.
Releases: Displays all the releases you have created for this project.
Badges: Lists all the badges available for the releases of this bucket.
Targeting: Lists all game overrides using one of the bucket's badges.
Settings:
- Displays the following details: Bucket name, Description, Bucket write conditions, Bucket privacy.
- If the bucket is private, you can create, view, edit and delete the bucket access tokens of the bucket here. You can create a maximum of 20 access tokens per bucket.
You can delete a bucket by clicking on the Delete Bucket button, which appears in the header of the bucket details screen.
Entries
Buckets require content in order to create releases. This content comes in the form of entries (files) that you upload from a local source.
To add entries via the Unity Cloud Dashboard:
- Select a bucket from the bucket view list.
- From the Latest tab, click Upload using the dashboard if the bucket is empty, or Upload Content if the bucket already contains entries.
- Drag files into the designated space, or click Browse and select the files you want to add.
- Click Upload Files.
Files are uploaded at the root of the bucket. To update files in a child directory, you can either update the files manually in the entries list, or drag and drop your root directory, which will update all nested directories and files already in your bucket.
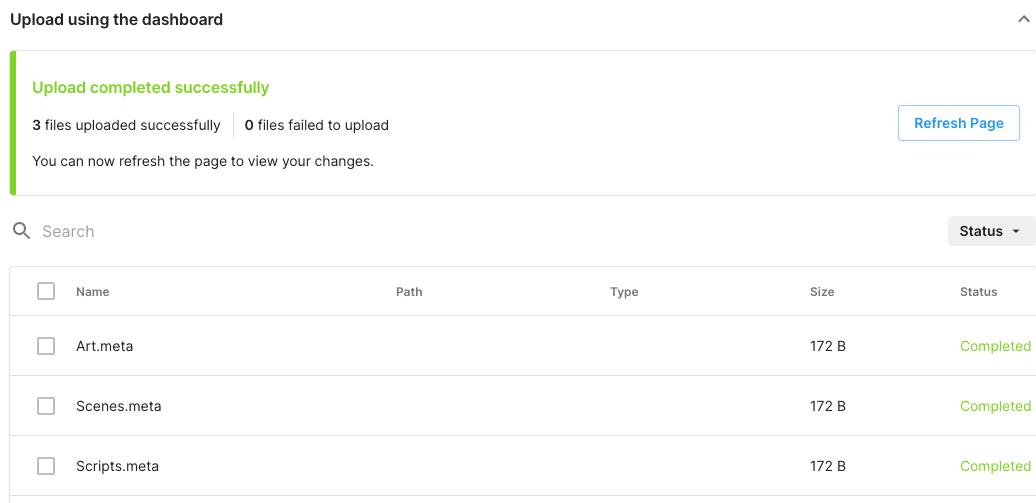
To cancel an entries sync command, press Cancel during the process. Any entries synced prior to cancellation remain uploaded, so you must delete them from your bucket.
After uploading your files, a box appears summarizing the process. Click Refresh Page to update the status of the bucket's information.
Select the name of an entry to access its details. A dialog opens displaying the following information:
The entry ID
The entry's file path
The type of content (set via the API)
The MD5sum content hash value
The current version of this entry in a format required for the Addressable URL
The Addressable URL of this entry
If you are using the Unity Addressables packages with your project, you can use this URL for your remote load paths.
A Copy to clipboard button appears to easily copy the Addressable URL.
Click the More Items menu (⋮) at the end of an entry's row to gain access to two buttons:
- Download file: Downloads the entry file to your local machine.
- Update file: Opens a dialog to replace the content of that entry with another file.
After changing your entries, each entry receives one of the following labels: Added, Modified, Unchanged, Removed. You can sort through any of these labels by using the dropdown found in the Current Entries list.
Releases
You can manage the releases you have created for your project on the Releases tab.
To create a release:
- Select a bucket from the Content Delivery Buckets page that contains unreleased changes.
- In the bucket’s page, select the Latest tab.
- Select the Create Release button.
- In the Create Release dialog box, enter optional release notes and click Next.
- On the next page, choose the badges that you want to assign to this release (removing them from their current releases), and select Next.
- Review your changes, then select Submit to finalize, or Back to continue editing. The Unreleased Changes notification changes to reflect the new status.
After you create a release, it appears in the list in the Releases tab, with its creation date and any associated badges. You can assign a badge and edit the release notes of a release via the More Items menu (⋮) at the end of a release’s row.
When you click on the Release # of a release in the list, you see the following information:
The GUIDs related to that release:
- Project ID
- Bucket ID
- Release ID
The Addressable remote path URLs for that release and its related badges
If you are using the Unity Addressables packages with your project, you can use this URL for your remote load paths.
Useful CLI commands that you can easily copy to clipboard using the available button
Some situations in your project’s release pipeline might require you to move a release from one bucket to another, which is a process called promotion. If your bucket does not have any unreleased changes, you can see the Promote Release button in your release’s details row.
To promote a release:
- Click the Release # of the release you want to promote in the Releases tab.
- In the release summary, click Promote Release.
- In the Promote Release window, select the environment in the Target Environment dropdown, and then the bucket from that environment to which you want to promote the release in the Target Bucket dropdown.
- Add any optional release notes, and select Next.
- On the next page, choose the badges that you want to assign to this release (removing them from their current releases), and select Next.
- Review your changes, then select Promote Release to finalize, or Back to continue editing.
Badges
Attaching a badge to a release allows your application to load content from whichever release the badge is assigned to.
To create a badge:
- Select a bucket from the Cloud Content Delivery Buckets page.
- Select the Badges tab.
- Select Add New.
- In the Add New Badge window, give the badge a unique name, and select its release from the releases table.
- Select Submit.
The badge now appears in the badge list in the Badges tab.
In the Badges table, you can see the following information:
The badge name
The release to which the badge is assigned
The Addressables URL of the badge
If you are using the Unity Addressables packages with your project, you can use this URL for your remote load paths.
A button to quickly copy the Addressables URL
You can edit a badge’s associated release, or delete the badge via the More Items menu (⋮) at the end of a badge’s row. You can only assign a badge to a single release at a time, but you can associate multiple different badges to a release.