Import Animations
Import animations into your Unity Studio projects.
읽는 시간 3분최근 업데이트: 6달 전
Unity Studio allows you to import animations, including embedded animations in and assets. Embedded animations are clips stored inside other assets, such as a character mesh with a walk cycle animation or a vehicle model with movement sequences.
.fbx.glbImport animations
You can import animations in the same way as you import any other asset:
- Go to the Project panel at the bottom of Unity Studio workspace.
- Select Add Assets to open the Asset Manager panel.
- In the Project dropdown, select the project you want to add animations to. A list of assets that are already in your project appears.
- From the Asset Manager, select Add. Select one of the following options:
- Add asset: Upload a single file from your computer.
- Add multiple assets: Upload multiple files from your computer.
- Upload your files using one of the following options:
- Drag files from your computer into the upload area.
- Select Choose your file to browse and select files from your computer.
- Select Upload. The window closes and your files show in the Asset Manager.
- Enable the checkbox for each asset/animation you want to import. The selected assets appear in a panel on the right.
- Select Import to add the files to your project.
You can find the imported animations in the folder in the Project panel. If your imported asset has embedded animations, you can find the clips under the asset in .
My AssetsMy AssetsAdd imported animations to your scene
To add an imported animation to your scene, drag the animation from the Project panel into the Hierarchy panel. This creates a new GameObject with an Animation component (visible in the Inspector window) that has the imported clip assigned.
Use embedded animations
You can reference embedded clips the same way you reference any other animation:
- From a Button's On Click action.
- Via Logic nodes to play, pause, or stop animations.
Edit imported animations
Embedded animations are read-only, which ensures you can always access the original imported motion.
To edit an animation, you need to create an editable copy:
- In the Animation component, select the read-only embedded clip.
- Select Edit Animation.
- Studio creates a new editable copy and automatically opens the Animation Timeline window.
- Move or add keyframes on the Timeline to edit the clip.
Unity Studio adds the new editable copy to the folder with the same name as the original. You can rename it like any other asset: click the name or right-click the asset and select Rename.
My Assets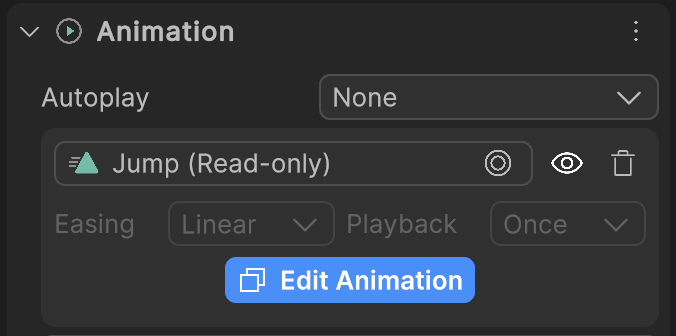
A read-only animation in the Animation component.