Virtual Shops
Implement virtual shops to let players purchases items in your game.
읽는 시간 8분최근 업데이트: 한 달 전
Virtual shops are a key feature in most free-to-play games. They allow players to purchase items and exchange resources within the game environment to facilitate the in-game economy. When properly implemented as part of your core game loop, they can drive engagement and provide opportunities for players to express their unique play styles.
Prerequisites
To use this sample use case, you must download and install the UGS Use Cases project in your Unity project.
Overview
To see this use case in action:
- In the Unity Editor Project window, select Assets > Use Case Samples > Virtual Shops, and then double-click to open the sample scene.
VirtualShopsSample.unity - Enter Play mode to interact with the use case.
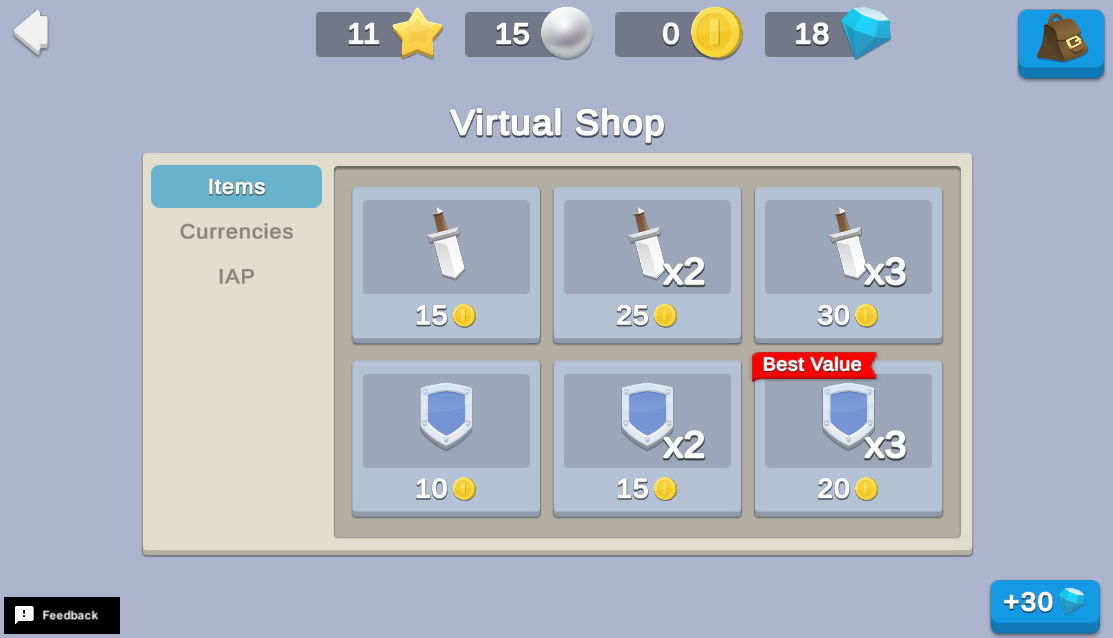
At startup, this scene reads the Remote Config for the Virtual Shops use case sample as well as all required Virtual Purchases. It sets up sprites for all Currency and Inventory Items for use in the Shops display, initializes the Currency HUD with correct values and presents the first Category's Virtual Purchases to the player for purchase.
Initialization
When the scene loads, the script performs the following initialization tasks:
VirtualShopsSceneManager.cs-
Initializes Unity Gaming Services.
-
Signs in the player anonymously using the Authentication service. If you’ve previously initialized any of the other sample scenes, Authentication will use your cached Player ID instead of creating a new one.
-
Retrieves and updates the player's currency balances from the Economy service.
-
Queries the Remote Config service to fetch the Virtual Shops configuration data. This includes:
- Currency and inventory item sprites from the Addressables service so they can be displayed in the shop UI.
- Virtual Purchase Transactions for use in the store. The Remote Config data determines which categories to put each transaction in, and which icons to use.
-
The client updates the shop UI based on the Remote Config data.
Functionality
Inventory button
The inventory button in the top-right corner opens a pop-up showing all currently-owned inventory items. Use it to confirm that purchased items were added to your inventory appropriately. Note that inventory items appear in random order, so new purchases may appear in the middle of the list.
Gain currency debug button
The +30 Coins button in the top-right corner adds currency for testing purposes.
Virtual Purchases
The shop interface shows the items for sale, along with their respective costs. Click any item to attempt a Virtual Purchase through the Economy service. A pop-up appears to confirm if the purchase succeeded or failed.
Category buttons
You can change purchase categories by clicking the tabs to the left of the purchase grid. Choose between Currencies, Items, and IAP to display the corresponding list of purchases as specified by the Remote Config JSON.
Back button
Pressing the back button in the top-left corner returns you to the Start Here scene.
Setup
Requirements
To replicate this use case, you need the following Unity packages in your project:
Package | Role |
|---|---|
| Addressables | Allows developers to ask for an asset via its address. Wherever the asset resides (local or remote), the system will locate it and its dependencies, then return it. |
| Analytics | Sends events that allow you to track a player's in-game interactions, retention, and other information that you can use to analyze and improve the game experience. |
| Authentication | Automatically signs in the user anonymously to keep track of their data on the server side. |
| Deployment | Provides a cohesive interface to deploy assets for Cloud Services. |
| Economy | Keeps track of the player's currencies and inventory items, as well as definitions for all currencies, inventory items and Virtual Purchase transactions. Currencies and inventory items all include Custom data to identify which icon sprites to use in the shops. |
| Remote Config | Provides key-value pairs where the value that is mapped to a given key can be changed on the server-side, either manually or based on specific Game Overrides. The SHOPS_CONFIG entry stores all details for Virtual Purchase transactions to be available in each Category. |
To use these services in your game, activate each service for your Organization and project in the Unity Dashboard.
Unity Cloud services configuration
To replicate this sample scene's setup in your own Unity project, configure the following items:
- Economy items
- Remote Config values
To configure these items you can use the Deployment package, or manually enter them using the Unity Dashboard.
The recommended best practice is to use the Deployment package as it greatly accelerates this process.
Using the Deployment package
To deploy configurations using the Deployment package:
- Open the Deployment window.
- Check in and
Common.Virtual Shop - Click .
Deploy Selection
This deploys all the necessary items.
Using the Unity Dashboard
You can use the Unity Dashboard to manually configure your services by project and environment.
Refer to the following sections to configure this sample.
Economy
Configure the following resources in the Unity Dashboard:
|
|
|
|
|
|---|---|---|---|---|
Currency | Coin | |
| A currency you can spend and purchase in virtual shops. |
Currency | Gem | |
| A currency you can spend in virtual shops. |
Currency | Pearl | |
| A currency you can purchase in virtual shops. |
Currency | Star | |
| A currency you can purchase in virtual shops. |
Inventory Item | Sword | |
| An item you can purchase in virtual shops. |
Inventory Item | Shield | |
| An item you can purchase in virtual shops. |
* This sample uses Addressable Assets to implement the sprite icons for all Economy resources. As the developer, you can add the Addressables address of the icon for each currency directly in the Economy dashboard, and then retrieve it at runtime without needing to change your code. This is helpful if for example, you want to update currency icons by changing the address in your dashboard instead of updating your app. To do this for each resource:
- Select the currency you want to edit.
- Under Custom data, click the plus (+) icon to add a custom JSON script.
- Add the value, along with the corresponding Addressable address string listed in the table.
spriteAddress
When the client needs to initialize sprites (for example, to display the costs and rewards for each virtual purchase for sale in the shop), the resource’s ID acts as a dictionary key to quickly find the associated spirit. The client calls the script’s method at startup to initialize the dictionary with all icon sprites, and the dictionary is used to look up Economy IDs to find the associated sprite to use in the shop display.
AddressablesManager.csPreloadAllEconomySprites()preloadedSpritesByEconomyIdIn addition, configure the following virtual purchases for the shops:
Item name | ID | This purchase buys | This purchase costs |
|---|---|---|---|
| 1 Sword for Coins | | Sword (1) | Coins (15) |
| 2 Sword for Coins | | Sword (2) | Coins (25) |
| 3 Sword for Coins | | Sword (3) | Coins (30) |
| 1 Shield for Coins | | Shield (1) | Coins (10) |
| 2 Shield for Coins | | Shield (2) | Coins (15) |
| 3 Shield for Coins | | Shield (3) | Coins (20) |
| 100 Coin for Gems | | Coin (100) | Gem (7) |
| 250 Coin for Gems | | Coin (250) | Gem (15) |
| 1000 Coin for Gems | | Coin (1000) | Gem (25) |
| 1 Star for Coins | | Star (1) | Coin (25) |
| 3 Pearl for Coins | | Pearl (3) | Coin (50) |
Remote Config
Set up the following config values in the Unity Dashboard:
Key | Type | Description | Value |
|---|---|---|---|
| JSON | Contains information about Virtual Purchases and where they should appear in the shops. | See the below JSON code snippet. |
SHOP_CONFIG JSON values
{ "categories": [{ "id": "Items", "enabledFlag": true, "items": [{ "id": "1_SWORD_FOR_COINS" }, { "id": "2_SWORD_FOR_COINS", "color": "#FFFFFFFF", "badgeIconAddress": "" }, { "id": "3_SWORD_FOR_COINS", "color": "#FFFFFFFF", "badgeIconAddress": "" }, { "id": "1_SHIELD_FOR_COINS", "color": "#FFFFFFFF", "badgeIconAddress": "" }, { "id": "2_SHIELD_FOR_COINS", "color": "#FFFFFFFF", "badgeIconAddress": "" }, { "id": "3_SHIELD_FOR_COINS", "color": "#FFFFFFFF", "badgeIconAddress": "Sprites/Badges/Banner", "badgeColor": "#FF0000FF", "badgeText": "Best Value", "badgeTextColor": "#FFFFFFFF" }] }, { "id": "Currencies", "enabledFlag": true, "items": [{ "id": "100_COIN_FOR_GEMS", "color": "#FFFFFFFF", "badgeIconAddress": "" }, { "id": "250_COIN_FOR_GEMS", "color": "#FFFFFFFF", "badgeIconAddress": "" }, { "id": "1000_COIN_FOR_GEMS", "color": "#FFFFFFFF", "badgeIconAddress": "Sprites/Badges/Banner", "badgeColor": "#FF0000FF", "badgeText": "Best Value", "badgeTextColor": "#FFFFFFFF" }, { "id": "1_STAR_FOR_COINS", "color": "#FFFFFFFF", "badgeIconAddress": "" }, { "id": "3_PEARL_FOR_COINS", "color": "#FFFFFFFF", "badgeIconAddress": "" }] }, { "id": "IAP", "enabledFlag": false, "items": [] }]}