Troubleshoot common Mobile Measurement Partner (MMP) integration errors.
Read time 3 minutesLast updated a day ago
When you integrate a Mobile Measurement Partner (MMP) with your User Acquisition campaign, the dashboard checks that your campaign is successfully receiving data. The dashboard validates the following data-sharing indicators:
Your campaign receives install data within two days of launch.
Your campaign receives post-install event data within seven days of launch.
If your campaign fails either of these validation checks, the dashboard flags your campaign with an integration error message. Refer to the following sections for information on how to resolve these errors.
Important
This troubleshooting guide covers integration issues for the following MMPs:
If your campaign doesn't receive install data within two days of launch, it can negatively impact performance, and attribution. The dashboard flags this issue with the following error message:
Integration-blocking issues detected for one or more campaigns. These issues can severely impact performance. Resolve this issue to ensure accurate tracking and delivery: Within 2 days of launch, campaigns must receive at least one install postback.
Cause
Your campaign can fail to accrue install data if you misconfigure your MMP integration. Refer to your MMP-specific integration guide for step-by-step integration instructions.
Resolutions
Consider both of the following resolutions to ensure your campaign receives install data.
Share install data from all sources
When you share install data with Unity, ensure that you include data from your entire user base, including Unity-attributed, unattributed, and organic installs. Refer to the Introduction to Attribution for definitions of each attribution type.Each MMP has unique terminology for this setting. Refer to the following examples of how to share install data from all sources in supported MMP dashboards:
To share install data for all of your user base follow these steps in the Adjust dashboard:
Go to the Campaign Lab tab > Partners page.
From the What sources of data do you want to share options, select Data from all attribution sources.
To share install data for all of your user base, follow these steps in the Airbridge dashboard:
Select Organization from the top menu bar.
On the Organization settings page, go to User Management > Agency.
Find your app in the App list and select Details. If you haven't granted App access for your app, refer to the Airbridge Organization-level User Management documentation.
From the App Access Settings, select Edit to open the access settings dialog.
Go to the Unattributed Event Data section of the dialog.
Enable the Unattributed Event Data toggle.
Select Save.
Use these steps to share data from all sources in the AppsFlyer dashboard:
Go to the Integration tab > Default postbacks section.
From the for users from dropdown, select All media sources, including organic.
To share install data for all of your user base, follow these steps in the ByteBrew dashboard:
In the Install Settings tab of the ByteBrew integration setup, go to the Send all install events from section.
Select All Partners and Organics.
To share install data for all of your user base, follow these steps in the Singular dashboard:
Go to the Attribution Postbacks & Settings tab > Attribution Postbacks table.
Enable the Send All checkbox.
To share install data for all of your user base, follow these steps in the Tenjin dashboard:
Go to the Callbacks tab for your app.
From the User filter dropdown, select all users.
Review integration setup
Review the integration guide for your preferred MMP to ensure it's configured correctly. Review the integration activation, advertiser credentials, and data-sharing settings in your partner's integration guide:
Complete the following steps to correctly integrate Adjust and share data with your User Acquisition campaign:
1
Activate Unity Ads in the Adjust dashboard
To activate the integration with Unity Ads, follow these steps:
In the Integration tab > In-app event postbacks section, map AppsFlyer events to Unity Ads events.You can map any in-app event you set up in the AppsFlyer dashboard. Refer to AppsFlyer's In-app events documentation for a list of AppsFlyer event names.
Important
Ensure that your AppsFlyer event name matches the event identifiers in your app's code exactly. If you incorrectly map an event, your campaign ignores the data.
Refer to the following example of correct event mapping:
AppsFlyer event
mapped to partner event
for users from
including
af_purchase
purchase
All media sources, including organic
Values & revenue
milestone_event_name
level_complete
All media sources, including organic
Values & revenue
af_app_opened
session
All media sources, including organic
Values & no revenue
AppsFlyer event mapping
Ensure that you make the following selections:
For all events, select All media sources, including organic in the for users from dropdown.
For Level Complete and Purchase events, select Values & revenue from the including dropdown.
For Session events, select Values & no revenue from the including dropdown.
Important
To access the AppsFlyer Revenue Settings menu and share ad revenue data with Unity, you need an AppsFlyer ROI360 subscription. Refer to the Ad revenue attribution documentation in the AppsFlyer Help Center for details and instructions.
To share ad revenue event data with your campaign, follow these steps:
Go to the Ad revenue tab of your AppsFlyer integration setup.
Activate the Get ad revenue data toggle.
AppsFlyer Ad revenue toggle
From the AppsFlyer dashboard side menu, go to Settings > Revenue Settings.
In the Ad revenue tab of the Revenue settings page, select New ad revenue integration.
Select Unity Ads from the list of revenue partners.
In the partner configuration, select Impression-level (via SDK) with Device-level (via S2S API) as the report type.
Impression-level and Device-level ad revenue data
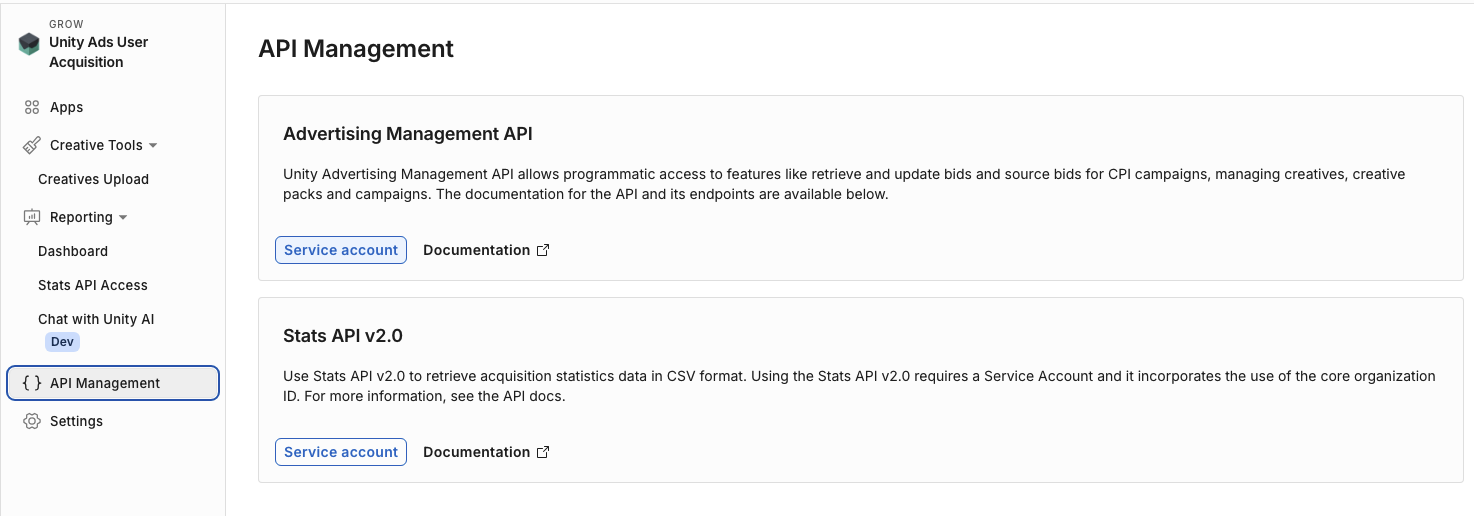
Enter your API credentials. Enter your Game ID in the App Key field. To retrieve your Secret key from the Unity dashboard, refer to the following steps:
To retrieve your Secret key from the Unity Dashboard, follow these steps:
From the left navigation menu, go to API Management.
Select Advertising Management API > Service account.
API Management
If you don't have a service account, select + New. If you have a service account already, select it from the table.
In the service account page, go to the Keys section.
Select + Add key to generate a new key.
Select the copy buttons following the Secret key to copy the ID.
Go back to the Integration tab of the AppsFlyer dashboard.
In the In-app event postbacks section, map Ad Revenue events to
ad_revenue
. Refer to the following example of correct ad revenue mapping:
AppsFlyer event
mapped to partner event
for users from
including
af_ad_revenue
ad_revenue
All media sources, including organic
Values & revenue
4
Set partner permissions
In the Permissions tab, configure the following permissions settings:
Activate the Toggle Ad Network Permissions toggle to enable all other toggles.
Activate the following toggles:
Configure integration
Configure in-app event postbacks
Access retention report
Access aggregate conversions and in-app event data
Access aggregate revenue data
View validation rules
Access Protect360 dashboard and raw data
Access ad revenue raw data (UA signals)
For descriptions of each permission, refer to the Permissions tab documentation in the AppsFlyer Help Center.
Complete the following steps to correctly integrate ByteBrew and share data with your User Acquisition campaign:
1
Activate Unity Ads in the ByteBrew dashboard
Do the following in the ByteBrew dashboard to activate the Unity Ads integration:
Select your app from the dashboard navigation menu.
Go to Attribution > Network Settings and find UnityAds from the list of networks.
Next to UnityAds, select Setup to open the Add Ad Network dialog.
Complete the Network Settings fields. Refer to the following instructions for help locating these values in the User Acquisition dashboard:
To retrieve your API Key from the User Acquisition dashboard, do the following:
Go to the API Management page.
Copy the API Key in the Stats API v1.0 section.
To retrieve your Game ID from the Apps page of the User Acquisition dashboard, follow these steps:
From the dashboard left navigation menu, go to Apps. The provided table lists each of your organization's apps. Following each app name, the dashboard displays the app platform and Game ID.
Select the Copy symbol next to the ID to copy it to your clipboard.
To retrieve your Organization ID from the User Acquisition dashboard, follow these steps:
Go to the Settings page.
Copy the Organization ID from the Organization section of your settings.
To retrieve your Organization core ID from the Settings page of the User Acquisition dashboard, follow these steps:
Go to the Organization section of the Settings page.
Copy the numeric ID next to Organization core ID.
2
Configure data-sharing settings
To configure data-sharing settings with ByteBrew, do the following in the Install Settings tab of the integration flow:
To enable view-through attribution, select the Enable view through tracking checkbox and configure the view-through lookback window. ByteBrew generates Click-through attribution links by default.
Configure your attribution lookback windows in the following Install Settings fields:
Install setting
Required
Configuration
Notes
Click-Through Window
Yes
Use the Days selector to set the number of days an install can be attributed after a user clicks on your ad.
The maximum click-through lookback period is 30 days. The recommended best practice is to set the click-through setting to seven days or more for accurate attribution.
View-Through Window
No
Use the Days selector to set the number of days an install can be attributed after a user watches your ad.
The maximum view-through lookback period is seven days. The recommended best practice is to set the view-through setting to one day or more for accurate attribution.
For more information about attribution lookback options, refer to the Attribution lookback settings section of the ByteBrew data-sharing reference.
In the Send all install events from section, choose whether to pass engagement data from all of your app's installs (including unattributed install data) or just those attributed to Unity. Choose from the following options:
Only this partner
All Partners and Organics
This Partner and Organics
For more information about the install data source options, refer to the Attribution data sources section of the ByteBrew data-sharing reference.
3
Map events
To map post-install events with ByteBrew, do the following in the Postback Settings tab of the integration flow:
To add a post-install event you want to pass to Unity, select + Add Postback Event and choose from the following options:
Don’t define a new user event in your app code. ByteBrew tracks new user events by default using the User App Open Event option. For more information, refer to the ByteBrew Developer Hub Attribution documentation.
In the Postback Events Settings section, choose whether to pass post-install event data from all your app's installs (including unattributed install data) or just those attributed to Unity. Choose from the following options:
Send only from this partner
Send from all Networks and Organics
Send only from this Partner and Organics
For more information about the post-install event data source options, refer to the Postback data sources section of the ByteBrew data-sharing reference.
On the final tab of the network setup dialog, you can copy your attribution links. For instructions on how to integrate these URLs in the User Acquisition dashboard, refer to Integrate attribution links with Unity.
Select Finish to complete the integration.
Complete the following steps to correctly integrate Singular and share data with your User Acquisition campaign:
1
Activate Unity Ads in the Singular dashboard
Go to Attribution Setup > Partner Configuration.
Select Add a Partner. Search for and select Unity Ads.
Enter your advertiser Game ID in the Unity Ads Game ID field.
Note
Enter your Game ID exactly as shown in the User Acquisition dashboard. Mismatched Game IDs prevent Unity from receiving events correctly.
2
Configure data-sharing settings
To configure data-sharing settings, follow these steps:
In the Attribution Postbacks & Settings tab, go to the Attribution Postbacks table.
Select the Install checkbox in the Attribution Event column.
In the same row, select the following checkboxes:
Send View Through
Send All
Send Fraud Postbacks
Send View Through, All, and Fraud Postbacks
3
Map post-install events
To map events, follow these steps:
In the In app Events Postback tab, select Send all ad monetization events from the Revenue Events Postbacks dropdown.
Important
Singular is the only MMP that supports sending all monetization events together. To send ad revenue events with Singular, ensure that you select Send all ad monetization events from the Revenue Events Postbacks dropdown and select
__REVENUE__*
from the SDK Event Name dropdown.
Send all ad monetization events
To map events, select your Singular events in the SDK Event Name column and map them to Unity Ads events in the Event Name column as follows:
Singular SDK Event name
Unity Ads Event Name
Notes
__iap__
custom_purchase_event_name
purchase
__REVENUE__*
ad_revenue
Important
To send ad revenue events with Singular, ensure that you select Send all ad monetization events from the Revenue Events Postbacks dropdown above the event table.
__SESSION__
session
To share data from your entire user base, select the Send all checkbox for each event.
In the Postback Window Starting Point column, select Unlimited for each event.
If you have a Singular Enterprise account, set the Postback Window (days) to Unlimited. Otherwise, set the window to
30
days.
Select the Include Revenue checkbox for each row.
Include revenue
Complete the following steps to correctly integrate Tenjin and share data with your User Acquisition campaign:
1
Copy credentials from the Unity Dashboard
You need the following Unity account credentials to complete your Tenjin integration:
To retrieve your Game ID from the Apps page of the User Acquisition dashboard, follow these steps:
From the dashboard left navigation menu, go to Apps. The provided table lists each of your organization's apps. Following each app name, the dashboard displays the app platform and Game ID.
Select the Copy symbol next to the ID to copy it to your clipboard.
Optionally, hover over the app name to copy the Campaign Set ID and Store ID as well.
Note
Enter your Game ID exactly as shown in the User Acquisition dashboard. Mismatched Game IDs prevent Unity from receiving events correctly.
Note
Only Organization Owners or Organization Managers can create service accounts and secret keys. Refer to User types, roles and permissions for more information.
To retrieve your Secret Key and Key ID from the User Acquisition dashboard, follow these steps:
From the left navigation menu, go to API Management.
Select Advertising Management API > Service account.
API Management
If you don't have a service account, select + New. If you have a service account already, select it from the table.
In the service account page, go to the Keys section.
Select + Add key to generate both keys.
Select the copy buttons following the Key ID and the Secret key to copy both credentials.
To retrieve your Organization core ID from the Settings page of the User Acquisition dashboard, follow these steps:
Go to the Organization section of the Settings page.
Copy the numeric ID next to Organization core ID.
Note
Ensure that you copy the numeric Organization core ID, not the alphanumeric Organization ID.
2
Activate Unity Ads in the Tenjin dashboard
To integrate Unity with Tenjin, follow these steps in the Tenjin dashboard:
Go to the Configure tab and select Channels.
Search for Unity Ads in the Marketing Channel Name field.
In the New Marketing Channel setup for Unity Ads, enter the Unity account credentials you copied from the Unity dashboard and give your account a name.
In the Tenjin navigation menu, go to the Campaigns tab and select Create Campaign.
Select Unity Ads from the Marketing Account dropdown.
Choose your app from the App dropdown and give your campaign a descriptive Name.
When the system prompts you with a Callback to be created message, follow the provided link to continue and generate an attribution link.
3
Configure data-sharing settings
With Tenjin, configuring the data-sharing settings also maps your in-app events. To configure data-sharing settings and map events with Tenjin, do the following as you finish the activation workflow:
After you follow the link in the Callback to be created message, select Unity Ads from the Channels and Partners dropdown.
In the Channel callbacks section, activate the following toggles:
Unity Ads ad revenue
Unity Ads app open
Unity Ads IAP
Unity Ads install
Important
Don't map ad revenue events as In-App Purchase events. If your Tenjin account supports ad revenue data-sharing, send this data as a dedicated Ad Revenue Impression event.If your account doesn't support ad revenue data-sharing, don't send ad revenue as a different event type, as this event mismatching can cause campaign optimization to stop working.
For each event callback, select all users from the User filter dropdown.
Channel Callbacks for all users
No post-install event data in seven days
If your campaign isn't receiving post-install event data within seven days of launch, it can negatively impact performance and optimization. The dashboard flags this issue with the following error message:
Integration-blocking issues detected for one or more campaigns. These issues can severely impact performance. Resolve this issue to ensure accurate tracking and delivery: Within 7 days of launch, campaigns must receive at least one post-install event postback.
Causes
Several integration settings can disrupt your MMP sending post-install event data to your campaign, such as the following:
Attribution configured incorrectly
When you configure your attribution links incorrectly, your MMP can't share post-install event data with Unity.
Ad revenue reporting disabled
If you don't enable your MMP to send both values and revenue for Purchase and Ad Revenue events, the dashboard doesn't have the data it needs for the following optimized campaign goals:
Consider the following resolutions to ensure your campaign receives post-install event data.
Map post-install events correctly
When you share post-install event data with your campaign, ensure that you correctly map the post-install events. Correct mapping means that you align the Unity Ads event name with the correct MMP event name.
Warning
If you use any MMP other than Singular, don't combine ad revenue events with in-app purchase (IAP) events.
Refer to the following examples of correctly mapped event names:
Map your post-install events in the Map events to share with Unity Ads section of the Adjust integration setup as follows:
Important
If your Adjust account supports ad revenue data-sharing, send this data as a dedicated
ad_revenue
event. Otherwise, don't send ad revenue events. Mapping ad revenue events as other event types, such as
purchase
, can cause campaign optimization to stop working.
Event type
Unity Ads event name
Adjust event name
In-app purchase (IAP)
purchase
purchase
Ad revenue
ad_revenue
ad_revenue
Milestone completion
level_complete
{milestone_event_name}
Session
session
session
Map your post-install events in the Postback tab > Postback event setup page of the Airbridge integration setup as follows:
Event type
Unity Ads event name
Airbridge event name
In-app purchase (IAP)
purchase
Order complete (App)
Ad revenue
ad_revenue
Ad Impression (App)
Milestone completion
level_complete
Achieve Level (App)
Session
session
Open (App)
Map your post-install events in the In-app event postbacks table of the AppsFlyer integration setup as follows:
Important
If your AppsFlyer account supports ad revenue data-sharing, send this data with the Get ad revenue data toggle in the Ad revenue tab.Otherwise, don't send ad revenue events. Mapping ad revenue events as other event types, such as
af_purchase
, can cause campaign optimization to stop working.
Event type
Unity Ads
AppsFlyer
In-app purchase (IAP)
purchase
af_purchase
Milestone completion
level_complete
{milestone_event_name}
Session
session
af_app_opened
Map your post-install events in the Postback Settings tab of the ByteBrew integration setup as follows:
Event type
Unity Ads event name
ByteBrew event name
In-app purchase (IAP)
purchase
In-App Purchase event
Ad revenue
ad_revenue
Ad Watched event
Session
session
User App Open Event
Map your post-install events in the Revenue Events Postbacks and Events Postbacks tables of the Singular integration setup as follows:
Important
Singular is the only MMP that supports sending ad revenue and in-app purchase events together. To send ad revenue events with Singular, ensure that you select Send all ad monetization events from the Revenue Events Postbacks dropdown and select __REVENUE__* from the SDK Event Name dropdown.
Event type
Unity Ads event name
Singular event name
In-app purchase (IAP)
purchase
__iap__
{custom_purchase_event_name}
Ad revenue
ad_revenue
__REVENUE__*
Milestone completion
level_complete
Session
session
__SESSION__
Activate your post-install events in the Channel Callbacks page of the Tenjin integration setup as follows:
Important
If your Tenjin account supports ad revenue data-sharing, send this data as a dedicated Ad Revenue Impression event.
Otherwise, don't send ad revenue events. Mapping ad revenue as other event types, such as In-app Purchase, can cause campaign optimization to stop working.
Event type
Unity Ads event name
Tenjin event name
In-app purchase (IAP)
purchase
In-app Purchase
Ad revenue
ad_revenue
Ad Revenue Impression
Session
session
Unity ads app open
Configure data-sharing correctly
When you share post-install event data with your campaign, ensure that you configure your data sharing settings correctly.To send install and post-install event data to Unity, refer to the Configure data-sharing settings sections of the following partner-specific instructions:
Complete the following steps to correctly integrate Adjust and share data with your User Acquisition campaign:
1
Activate Unity Ads in the Adjust dashboard
To activate the integration with Unity Ads, follow these steps:
In the Integration tab > In-app event postbacks section, map AppsFlyer events to Unity Ads events.You can map any in-app event you set up in the AppsFlyer dashboard. Refer to AppsFlyer's In-app events documentation for a list of AppsFlyer event names.
Important
Ensure that your AppsFlyer event name matches the event identifiers in your app's code exactly. If you incorrectly map an event, your campaign ignores the data.
Refer to the following example of correct event mapping:
AppsFlyer event
mapped to partner event
for users from
including
af_purchase
purchase
All media sources, including organic
Values & revenue
milestone_event_name
level_complete
All media sources, including organic
Values & revenue
af_app_opened
session
All media sources, including organic
Values & no revenue
AppsFlyer event mapping
Ensure that you make the following selections:
For all events, select All media sources, including organic in the for users from dropdown.
For Level Complete and Purchase events, select Values & revenue from the including dropdown.
For Session events, select Values & no revenue from the including dropdown.
Important
To access the AppsFlyer Revenue Settings menu and share ad revenue data with Unity, you need an AppsFlyer ROI360 subscription. Refer to the Ad revenue attribution documentation in the AppsFlyer Help Center for details and instructions.
To share ad revenue event data with your campaign, follow these steps:
Go to the Ad revenue tab of your AppsFlyer integration setup.
Activate the Get ad revenue data toggle.
AppsFlyer Ad revenue toggle
From the AppsFlyer dashboard side menu, go to Settings > Revenue Settings.
In the Ad revenue tab of the Revenue settings page, select New ad revenue integration.
Select Unity Ads from the list of revenue partners.
In the partner configuration, select Impression-level (via SDK) with Device-level (via S2S API) as the report type.
Impression-level and Device-level ad revenue data
Enter your API credentials. Enter your Game ID in the App Key field. To retrieve your Secret key from the Unity dashboard, refer to the following steps:
To retrieve your Secret key from the Unity Dashboard, follow these steps:
From the left navigation menu, go to API Management.
Select Advertising Management API > Service account.
API Management
If you don't have a service account, select + New. If you have a service account already, select it from the table.
In the service account page, go to the Keys section.
Select + Add key to generate a new key.
Select the copy buttons following the Secret key to copy the ID.
Go back to the Integration tab of the AppsFlyer dashboard.
In the In-app event postbacks section, map Ad Revenue events to
ad_revenue
. Refer to the following example of correct ad revenue mapping:
AppsFlyer event
mapped to partner event
for users from
including
af_ad_revenue
ad_revenue
All media sources, including organic
Values & revenue
4
Set partner permissions
In the Permissions tab, configure the following permissions settings:
Activate the Toggle Ad Network Permissions toggle to enable all other toggles.
Activate the following toggles:
Configure integration
Configure in-app event postbacks
Access retention report
Access aggregate conversions and in-app event data
Access aggregate revenue data
View validation rules
Access Protect360 dashboard and raw data
Access ad revenue raw data (UA signals)
For descriptions of each permission, refer to the Permissions tab documentation in the AppsFlyer Help Center.
Complete the following steps to correctly integrate ByteBrew and share data with your User Acquisition campaign:
1
Activate Unity Ads in the ByteBrew dashboard
Do the following in the ByteBrew dashboard to activate the Unity Ads integration:
Select your app from the dashboard navigation menu.
Go to Attribution > Network Settings and find UnityAds from the list of networks.
Next to UnityAds, select Setup to open the Add Ad Network dialog.
Complete the Network Settings fields. Refer to the following instructions for help locating these values in the User Acquisition dashboard:
To retrieve your API Key from the User Acquisition dashboard, do the following:
Go to the API Management page.
Copy the API Key in the Stats API v1.0 section.
To retrieve your Game ID from the Apps page of the User Acquisition dashboard, follow these steps:
From the dashboard left navigation menu, go to Apps. The provided table lists each of your organization's apps. Following each app name, the dashboard displays the app platform and Game ID.
Select the Copy symbol next to the ID to copy it to your clipboard.
To retrieve your Organization ID from the User Acquisition dashboard, follow these steps:
Go to the Settings page.
Copy the Organization ID from the Organization section of your settings.
To retrieve your Organization core ID from the Settings page of the User Acquisition dashboard, follow these steps:
Go to the Organization section of the Settings page.
Copy the numeric ID next to Organization core ID.
2
Configure data-sharing settings
To configure data-sharing settings with ByteBrew, do the following in the Install Settings tab of the integration flow:
To enable view-through attribution, select the Enable view through tracking checkbox and configure the view-through lookback window. ByteBrew generates Click-through attribution links by default.
Configure your attribution lookback windows in the following Install Settings fields:
Install setting
Required
Configuration
Notes
Click-Through Window
Yes
Use the Days selector to set the number of days an install can be attributed after a user clicks on your ad.
The maximum click-through lookback period is 30 days. The recommended best practice is to set the click-through setting to seven days or more for accurate attribution.
View-Through Window
No
Use the Days selector to set the number of days an install can be attributed after a user watches your ad.
The maximum view-through lookback period is seven days. The recommended best practice is to set the view-through setting to one day or more for accurate attribution.
For more information about attribution lookback options, refer to the Attribution lookback settings section of the ByteBrew data-sharing reference.
In the Send all install events from section, choose whether to pass engagement data from all of your app's installs (including unattributed install data) or just those attributed to Unity. Choose from the following options:
Only this partner
All Partners and Organics
This Partner and Organics
For more information about the install data source options, refer to the Attribution data sources section of the ByteBrew data-sharing reference.
3
Map events
To map post-install events with ByteBrew, do the following in the Postback Settings tab of the integration flow:
To add a post-install event you want to pass to Unity, select + Add Postback Event and choose from the following options:
Don’t define a new user event in your app code. ByteBrew tracks new user events by default using the User App Open Event option. For more information, refer to the ByteBrew Developer Hub Attribution documentation.
In the Postback Events Settings section, choose whether to pass post-install event data from all your app's installs (including unattributed install data) or just those attributed to Unity. Choose from the following options:
Send only from this partner
Send from all Networks and Organics
Send only from this Partner and Organics
For more information about the post-install event data source options, refer to the Postback data sources section of the ByteBrew data-sharing reference.
On the final tab of the network setup dialog, you can copy your attribution links. For instructions on how to integrate these URLs in the User Acquisition dashboard, refer to Integrate attribution links with Unity.
Select Finish to complete the integration.
Complete the following steps to correctly integrate Singular and share data with your User Acquisition campaign:
1
Activate Unity Ads in the Singular dashboard
Go to Attribution Setup > Partner Configuration.
Select Add a Partner. Search for and select Unity Ads.
Enter your advertiser Game ID in the Unity Ads Game ID field.
Note
Enter your Game ID exactly as shown in the User Acquisition dashboard. Mismatched Game IDs prevent Unity from receiving events correctly.
2
Configure data-sharing settings
To configure data-sharing settings, follow these steps:
In the Attribution Postbacks & Settings tab, go to the Attribution Postbacks table.
Select the Install checkbox in the Attribution Event column.
In the same row, select the following checkboxes:
Send View Through
Send All
Send Fraud Postbacks
Send View Through, All, and Fraud Postbacks
3
Map post-install events
To map events, follow these steps:
In the In app Events Postback tab, select Send all ad monetization events from the Revenue Events Postbacks dropdown.
Important
Singular is the only MMP that supports sending all monetization events together. To send ad revenue events with Singular, ensure that you select Send all ad monetization events from the Revenue Events Postbacks dropdown and select
__REVENUE__*
from the SDK Event Name dropdown.
Send all ad monetization events
To map events, select your Singular events in the SDK Event Name column and map them to Unity Ads events in the Event Name column as follows:
Singular SDK Event name
Unity Ads Event Name
Notes
__iap__
custom_purchase_event_name
purchase
__REVENUE__*
ad_revenue
Important
To send ad revenue events with Singular, ensure that you select Send all ad monetization events from the Revenue Events Postbacks dropdown above the event table.
__SESSION__
session
To share data from your entire user base, select the Send all checkbox for each event.
In the Postback Window Starting Point column, select Unlimited for each event.
If you have a Singular Enterprise account, set the Postback Window (days) to Unlimited. Otherwise, set the window to
30
days.
Select the Include Revenue checkbox for each row.
Include revenue
Complete the following steps to correctly integrate Tenjin and share data with your User Acquisition campaign:
1
Copy credentials from the Unity Dashboard
You need the following Unity account credentials to complete your Tenjin integration:
To retrieve your Game ID from the Apps page of the User Acquisition dashboard, follow these steps:
From the dashboard left navigation menu, go to Apps. The provided table lists each of your organization's apps. Following each app name, the dashboard displays the app platform and Game ID.
Select the Copy symbol next to the ID to copy it to your clipboard.
Optionally, hover over the app name to copy the Campaign Set ID and Store ID as well.
Note
Enter your Game ID exactly as shown in the User Acquisition dashboard. Mismatched Game IDs prevent Unity from receiving events correctly.
Note
Only Organization Owners or Organization Managers can create service accounts and secret keys. Refer to User types, roles and permissions for more information.
To retrieve your Secret Key and Key ID from the User Acquisition dashboard, follow these steps:
From the left navigation menu, go to API Management.
Select Advertising Management API > Service account.
API Management
If you don't have a service account, select + New. If you have a service account already, select it from the table.
In the service account page, go to the Keys section.
Select + Add key to generate both keys.
Select the copy buttons following the Key ID and the Secret key to copy both credentials.
To retrieve your Organization core ID from the Settings page of the User Acquisition dashboard, follow these steps:
Go to the Organization section of the Settings page.
Copy the numeric ID next to Organization core ID.
Note
Ensure that you copy the numeric Organization core ID, not the alphanumeric Organization ID.
2
Activate Unity Ads in the Tenjin dashboard
To integrate Unity with Tenjin, follow these steps in the Tenjin dashboard:
Go to the Configure tab and select Channels.
Search for Unity Ads in the Marketing Channel Name field.
In the New Marketing Channel setup for Unity Ads, enter the Unity account credentials you copied from the Unity dashboard and give your account a name.
In the Tenjin navigation menu, go to the Campaigns tab and select Create Campaign.
Select Unity Ads from the Marketing Account dropdown.
Choose your app from the App dropdown and give your campaign a descriptive Name.
When the system prompts you with a Callback to be created message, follow the provided link to continue and generate an attribution link.
3
Configure data-sharing settings
With Tenjin, configuring the data-sharing settings also maps your in-app events. To configure data-sharing settings and map events with Tenjin, do the following as you finish the activation workflow:
After you follow the link in the Callback to be created message, select Unity Ads from the Channels and Partners dropdown.
In the Channel callbacks section, activate the following toggles:
Unity Ads ad revenue
Unity Ads app open
Unity Ads IAP
Unity Ads install
Important
Don't map ad revenue events as In-App Purchase events. If your Tenjin account supports ad revenue data-sharing, send this data as a dedicated Ad Revenue Impression event.If your account doesn't support ad revenue data-sharing, don't send ad revenue as a different event type, as this event mismatching can cause campaign optimization to stop working.
For each event callback, select all users from the User filter dropdown.