Create a Custom UI
This document aims to enable you to make your own modifications to the Pixyz UI in order to develop a personalized application.
読み終わるまでの所要時間 5 分最終更新 3ヶ月前
Once the initial setup of Pixyz UI and its virtual environment is complete, launching it will automatically open a default UI from . It contains many useful windows that you might know from other applications, like a scene hierarchy, an inspector, a list of all materials or a uv viewer. As the sources of Pixyz UI are included in the sdk, you can modify and extend them as you wish. Moreover, creating a personalized viewer with a custom UI is simple and can be a useful step in pipeline validation.
default_ui.pyThis document aims to enable you to make your own modifications to Pixyz UI in order to develop a personalized application.
Create a simple viewer
As you can see in , the default UI is opened and run after importing the sdk. This will automatically create all the windows in imgui and add them to Pixyz UI.
pxzui/__init__.pyLet's create our own script to launch the default UI, it will be similar to . If you prefer, you can also copy its extra checks; however, we'll proceed with a minimal example:
__init__.pyimport pxzpxz.initialize()from pxzui.default_ui import DefaultUIdefault_ui = DefaultUI()default_ui.run()
DefaultUI is based on a class called PixyzUI. It also defines a default layout and instructs PixyzUI to store the modifications on closure in a specific location. In essence, it is forming another layer on top of it. For our example, we don't need that extra functionality, so let's just use the minimal PixyzUI.
We can instantiate it the same way:
import pxzpxz.initialize()from pxzui.pixyz_ui import PixyzUIpixyz_ui = PixyzUI()pixyz_ui.run()
This will open a simple window containing nothing but a viewer, gizmos and some basic functionality. Try importing a file via io.importScene before opening the UI to inspect the model. It also supports importing a model via drag&drop.
Add existing windows from the default UI
Most of the time, it won't be necessary to have all the windows that come with the default UI. As we have seen above, we can create a minimalistic viewer with . Let's imagine that for our current project, we still need to have some overview of the scene hierarchy. In the default UI, there is a window called SceneTree () that contains a hierarchical, searchable list of all occurrences in the scene. We can include this window in our previous example:
pxzui.pixyz_uiui/scene_tree.pyimport pxzpxz.initialize()from pxzui.pixyz_ui import PixyzUIfrom pxzui.ui.scene_tree import SceneTreefrom pxzui.window import Windowpixyz_ui = PixyzUI()# Create and add the scene tree windowscene_tree = SceneTree(pixyz_ui)scene_tree_window = Window("Scene Tree")scene_tree_window.gui_function = scene_tree.drawpixyz_ui.add_window(scene_tree_window)pixyz_ui.run()
A new window called Scene Tree will be visible in the UI (its initial size might be very small, as there is no layout file for it yet). It has exactly the same functionality as the scene tree from the default UI.
Extend Pixyz UI with your own widgets
To create your own imgui windows, you need to attach them to the Pixyz UI before executing it, just like we saw earlier. Pixyz UI uses imgui-bundle, enabling the creation of complex user interfaces with just a few lines of code.
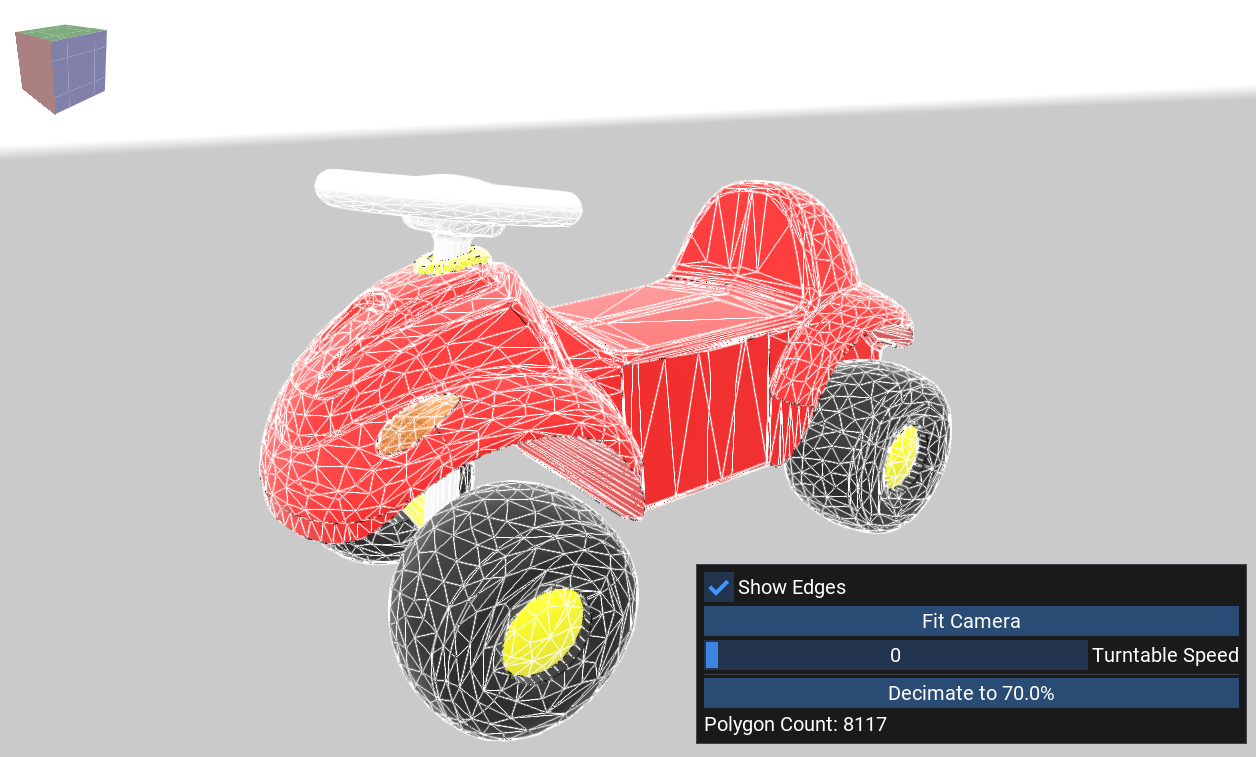
Here's an example on how to create a window with a background viewer and a few buttons to reduce its triangle count. It extends the simple viewer from the first example (Create a simple viewer) with a few lines to draw a customized window. Enable Show Edges to see the result of the decimation.
import pxzpxz.initialize()import glfw # Ensure glfw is imported before imgui_bundlefrom imgui_bundle import imguifrom pxzui.ui.pixyz_ui_events import PixyzUIEventfrom pxzui.window import Windowfrom pxzui.pixyz_ui import PixyzUIpixyz_ui = PixyzUI()pixyz_ui.emit(PixyzUIEvent.FIT_VIEWERS_EVENT)# Prevent idlingpixyz_ui.idle_flags.add_flag("camera_rotation")pixyz_ui.idle_flags.set_flag("camera_rotation", True)# Custom window definitioncustom_window = Window("My Window")custom_window.flags = imgui.WindowFlags_.always_auto_resize | imgui.WindowFlags_.no_resize | imgui.WindowFlags_.no_collapse | imgui.WindowFlags_.no_title_barcustom_window.enabled = True# Window functionturntable_speed = 20show_edges = Falsepoly_count = pxz.scene.getPolygonCount([pxz.scene.getRoot()])def custom_window_function(): # Will be executed every frame global turntable_speed, show_edges, poly_count # Show mesh edges to see the decimation effect show_edges_changed, show_edges = imgui.checkbox("Show Edges", show_edges) if show_edges_changed: pxz.view.setViewerProperty("ShowEdges", str(show_edges), pixyz_ui.background_viewer.viewer_id) # Center the camera to the model if imgui.button("Fit Camera", imgui.ImVec2(imgui.get_content_region_avail().x, 0)): pixyz_ui.emit(PixyzUIEvent.FIT_VIEWERS_EVENT) # Change the turntable speed _, turntable_speed = imgui.slider_int("Turntable Speed", turntable_speed, 0, 100) pixyz_ui.background_viewer.camera.rotate(turntable_speed/10000, 0.0) pixyz_ui.emit(PixyzUIEvent.VIEWER_FORCE_UPDATE_EVENT) imgui.separator() # Decimate the model to the given ratio when the button is clicked ratio = 70.0 def decimate(): global poly_count pxz.algo.decimateTarget(occurrences=[pxz.scene.getRoot()], targetStrategy=['ratio', ratio]) poly_count = pxz.scene.getPolygonCount([pxz.scene.getRoot()]) if imgui.button("Decimate to " + str(ratio) + "%", imgui.ImVec2(imgui.get_content_region_avail().x, 0)): pixyz_ui.process_queue.enqueue(decimate) # Display the polygon count imgui.text("Polygon Count: " + str(poly_count))custom_window.gui_function = custom_window_function# Add custom window to Pixyz UIpixyz_ui.add_window(custom_window)pixyz_ui.run()