AppsFlyer integration validation
Review the AppsFlyer integration rules and how to resolve integration setup warnings in the User Acquisition Dashboard.
Read time 27 minutesLast updated a month ago
When you integrate your user acquisition campaign with AppsFlyer, the Unity dashboard validates your integration setup to ensure it's configured correctly. If you don't resolve these integration errors, you can't launch new or paused campaigns, and your live campaigns can suffer serious performance and attribution issues.
Integration validation rules
Refer to the following tabs for lists of the required and recommended integration rules and their associated campaign goals:
Required integration rules
You must adhere to the following rules to set your campaigns live:
|
|
|
|---|---|---|
The Game ID in the AppsFlyer integration setup must match the Game ID in the Unity dashboard. | All campaign goals | |
View-through attribution must be enabled. | All campaign goals | |
View-through lookback windows must be at least seven days. | All campaign goals | |
Click-through lookback windows must be at least two days. | All campaign goals | |
AppsFlyer post-install events must be mapped to the correct Unity event name. | All optimized campaign goals, including the following:
| |
In-app purchase events must be mapped correctly. | ||
In-app purchase event postbacks must contain both values and revenue. | ||
Within seven days of launch, campaigns must have one or more in-app purchase event postbacks. | ||
Ad revenue event postbacks must contain both values and revenue. |
| |
Within seven days of launch, campaigns must have one or more Ad Revenue event postbacks. |
| |
Level Complete event postbacks must not include values or revenue. |
| |
Session event postbacks must not include values or revenue. |
| |
Within two days of launch, the app must have at least one install postback in the past 90 days. | All campaign goals |
Required rule resolutions
To meet the required integration rules, refer to the following resolution information.
Game ID
To meet this validation rule, ensure that the Game ID you enter in the AppsFlyer dashboard matches the Game ID in the Unity User Acquisition Dashboard exactly.
To enter your Unity Game ID in the AppsFlyer integration setup, follow these steps:
- Go to Collaborate > Partner Marketplace and search for to open your Unity Ads integration.
Unity Ads - In the Integration tab, go to the General settings section.
- Enter your Game ID in the Unity Ads Game ID field. To copy your Game ID from the Unity Dashboard, refer to the following steps:
To copy your Game ID from the User Acquisition Dashboard, follow these steps:
- Go to Apps from the left navigation menu of the dashboard. The provided table lists each of your organization's apps.
- Scroll or search to locate the desired app.
- Select Settings (
 ) at the end of the app row to open the app details page.
 - Go to the MMP settings section.
- Select copy (
 ) next to Game ID to copy the ID to your clipboard.

Unity Ads Game ID
View-through attribution
To meet this validation rule, ensure that you enable view-through attribution in your AppsFlyer integration setup.
To enable view-through attribution, follow these steps the AppsFlyer dashboard:
- Go to Collaborate > Partner Marketplace and search for to open your Unity Ads integration.
Unity Ads - In the Integration tab, go to the Install attribution section.
- Activate the Install view-through attribution toggle.

View-through attribution enabled
View-through lookback window
To meet this validation rule, set your view-through lookback window to 7 Days.
To set the view-through lookback window to 7 days, follow these steps in the AppsFlyer dashboard:
- Go to Collaborate > Partner Marketplace and search for to open your Unity Ads integration.
Unity Ads - In the Integration tab, go to the Install attribution section.
- Activate the Install view-through attribution toggle.
- Set the Install engaged view-through lookback window to Days.
- Using the slider, set the window to 7 Days.
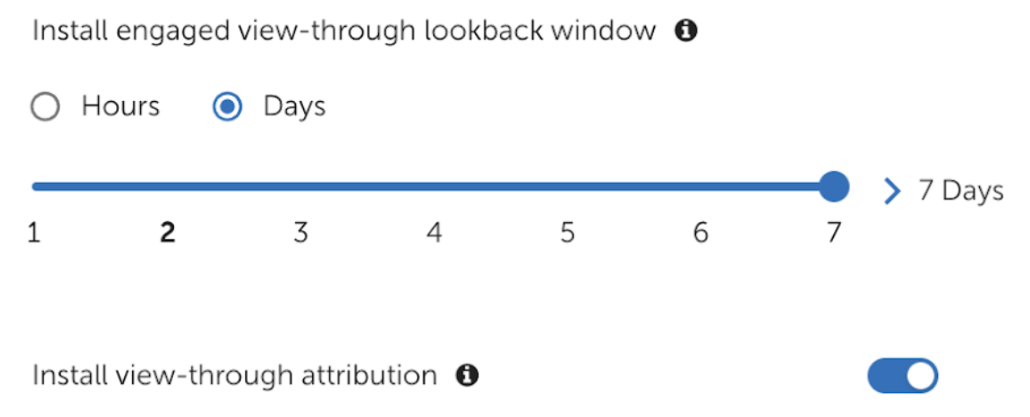
7-day view-through lookback window
Click-through lookback window
To meet this validation rule, set your click-through lookback window to 2 Days.
To set the click-through lookback window to 2 Days, follow these steps in the AppsFlyer dashboard:
- Go to Collaborate > Partner Marketplace and search for to open your Unity Ads integration.
Unity Ads - In the Integration tab, go to the Install attribution section.
- Set the Install engaged click-through lookback window to Days.
- Using the slider, set the window to 2 Days.
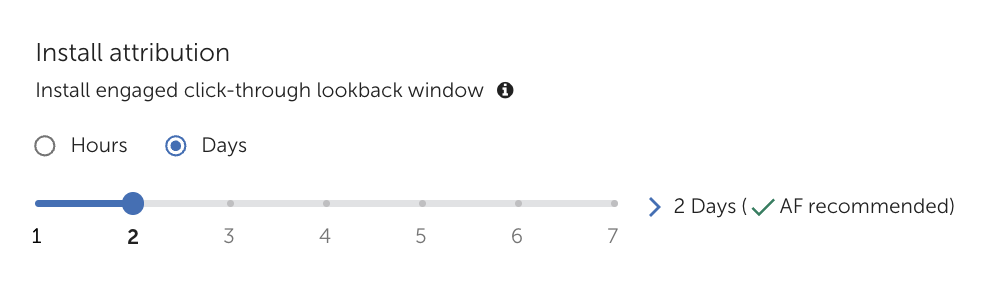
2-day click-through lookback window
AppsFlyer event mapping
To meet this validation rule, ensure that you map all AppsFlyer events to the correct Unity event name.
To map your AppsFlyer events to Unity events, follow these steps in the AppsFlyer dashboard:
- Go to Collaborate > Partner Marketplace and search for to open your Unity Ads integration.
Unity Ads - In the Integration tab, go to the In-app event postbacks section.
- Activate the In-app event postbacks toggle.
- Map your post-install events to Unity events in the mapped to partner event column as follows:
- Session events to
session - Level Complete events to
level_complete - Ad Revenue events to
ad_revenue - In-app Purchase events to
purchase
Refer to the following table for suggested AppsFlyer event names and required Unity event names:
|
|
|
|
|---|---|---|---|
Session | | | - |
Ad revenue | | | If your AppsFlyer account supports ad revenue data-sharing, enable ad revenue sharing with the Get ad revenue data toggle in the Ad revenue tab. Otherwise, don't send ad revenue events. Mapping ad revenue events as other event types can cause campaign optimization to stop working. Refer to the AppsFlyer Ad revenue attribution documentation for details and instructions. |
In-app purchase | | | Don't map revenue events to purchase events. |
Milestone completion |
| | You must enter |
You must enter the required Unity event name in the mapped to partner event field. You can enter custom SDK event names in the AppsFlyer event field. However, the recommended best practice is to use the Suggested AppsFlyer event names provided here.
In-app purchase event mapping
To meet this validation rule, ensure that you configure in-app purchase events correctly in your AppsFlyer integration setup.
To map your in-app purchase event postbacks, follow these steps in the AppsFlyer dashboard:
- Go to Collaborate > Partner Marketplace and search for to open your Unity Ads integration.
Unity Ads - In the Integration tab, go to the In-app event postbacks section.
- Activate the In-app event postbacks toggle.
- Map your Purchase event row as follows:
AppsFlyer event | mapped to partner event | for users from | including |
|---|---|---|---|
| | All media sources, including organic | Values & revenue |
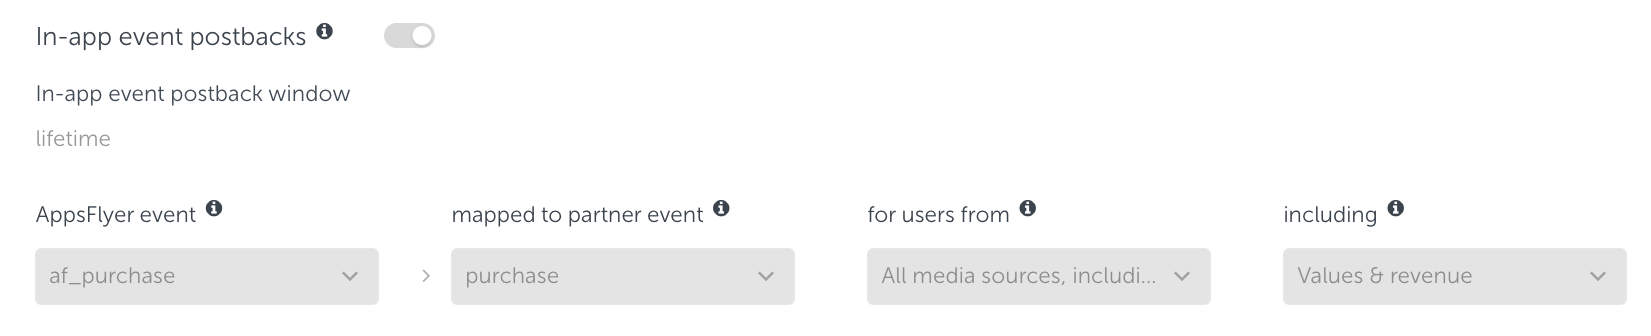
Purchase event mapping for In-app Purchase campaigns
In-app purchase event values and revenue
To meet this validation rule, ensure that you include Values & revenue when you map in-app purchase events in your AppsFlyer integration setup.
To configure the included data in your in-app purchase event postbacks, follow these steps in the AppsFlyer dashboard:
- Go to Collaborate > Partner Marketplace and search for to open your Unity Ads integration.
Unity Ads - In the Integration tab, go to the In-app event postbacks section.
- Activate the In-app event postbacks toggle.
- In the including column of the mapping table, select Values & revenue:
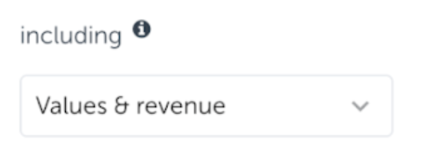
Share Purchase event values and revenue
In-app purchase postbacks
To meet this rule within seven days of launching your campaign, your app must have received one in-app purchase postback in the last 90 days.
Ensure that you map your purchase postbacks correctly and include both values and revenue.
To map your in-app purchase event postbacks, follow these steps in the AppsFlyer dashboard:
- Go to Collaborate > Partner Marketplace and search for to open your Unity Ads integration.
Unity Ads - In the Integration tab, go to the In-app event postbacks section.
- Activate the In-app event postbacks toggle.
- Map your Purchase event row as follows:
AppsFlyer event | mapped to partner event | for users from | including |
|---|---|---|---|
| | All media sources, including organic | Values & revenue |
Purchase event mapping for In-app Purchase campaigns
Ad revenue event values and revenue
To meet this validation rule, ensure that you include Values & revenue when you map ad revenue events in your AppsFlyer integration setup.
To configure this data-sharing setting, follow these steps in the AppsFlyer dashboard:
- Go to Collaborate > Partner Marketplace and search for to open your Unity Ads integration.
Unity Ads - In the Integration tab, go to the In-app event postbacks section.
- Activate the In-app event postbacks toggle.
- In the including column of the mapping table, select Values & revenue.
Refer to the following example of correct mapping:
AppsFlyer event | mapped to partner event | for users from | including |
|---|---|---|---|
| | All media sources, including organic | Values & revenue |
Share Ad Revenue event values and revenue
Ad revenue postbacks
To meet this rule within seven days of launching your campaign, your app must have received one ad revenue postback in the last 90 days.
Ensure that you enable ad revenue data in your AppsFlyer integration setup.
To share ad revenue event data with your campaign, follow these steps in the AppsFlyer dashboard:
Activate ad revenue sharing
To activate ad revenue data-sharing, follow these steps in the AppsFlyer dashboard:
- Go to Collaborate > Partner Marketplace and search for to open your Unity Ads integration.
Unity Ads - In the Ad revenue tab, activate the Get ad revenue data toggle.
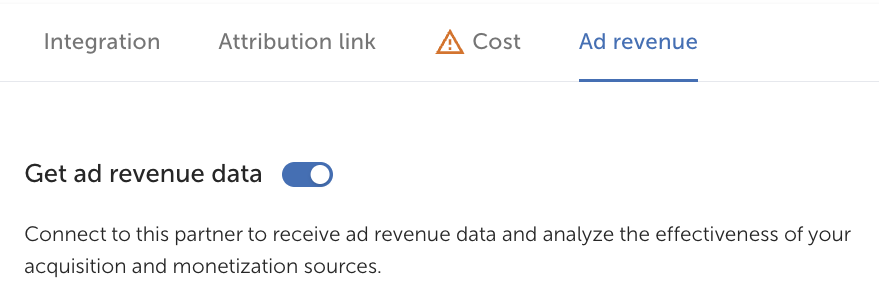
Get ad revenue toggle
Configure ad revenue data-sharing
To configure your ad revenue data-sharing settings, follow these steps in the AppsFlyer dashboard:
- From the AppsFlyer dashboard side menu, go to Settings > Revenue Settings.
-
In the Revenue settings > Ad revenue tab, select New ad revenue integration.
-
Select Unity Ads from the list of revenue partners.
-
In the partner configuration, select Impression-level (via SDK) with Device-level (via S2S API) as the report type.
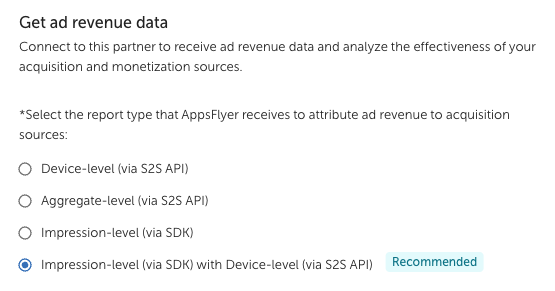
AppsFlyer Revenue settings configuration
Enter your API credentials
To finish your ad revenue data-sharing setup, follow these steps in the AppsFlyer dashboard Revenue Settings:
- Enter your Unity Game ID in the App key field. To retrieve your Game ID from the Unity Dashboard, refer to the following steps:
To copy your Game ID from the User Acquisition Dashboard, follow these steps:
- Go to Apps from the left navigation menu of the dashboard. The provided table lists each of your organization's apps.
- Scroll or search to locate the desired app.
- Select Settings () at the end of the app row to open the app details page.
- Go to the MMP settings section.
- Select copy () next to Game ID to copy the ID to your clipboard.
- Enter your Unity API Service account secret key in the Secret key field. To retrieve your secret key from the Unity Dashboard, refer to the following steps:
To retrieve your Secret key and Key ID from the User Acquisition dashboard, follow these steps:
Create or open your service account
To generate API keys, you need a service account. To access your service account, follow these steps:
- Go to Settings > API management.
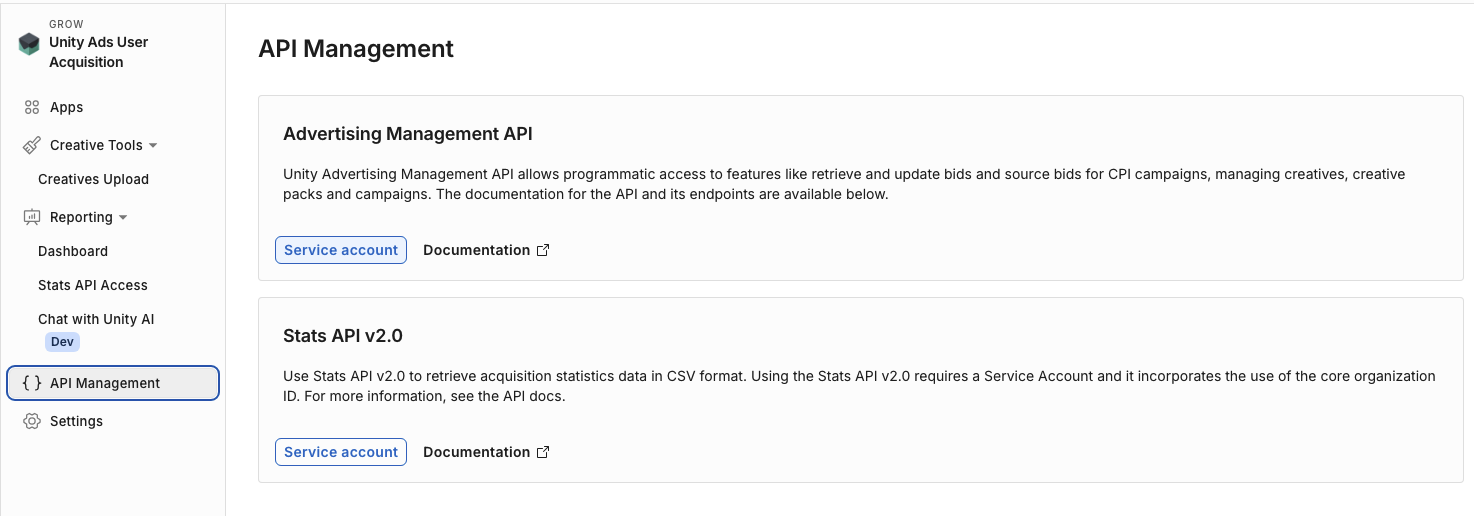
API management
- In the Stats API v2.0 section, select Service account.
- On the Service accounts page, select your account from the table. If you don't have a service account, select + New to create one.
Generate keys
To generate a secret key and key ID, follow these steps:
-
From your service account page, go to the Keys section.
-
Select + Add key to generate a Key ID and Secret key. You can't view previously-generated keys.
-
Select the copy buttons following the Key ID and the Secret key to copy both credentials.
Assign the organization role
A service account with no role assigned can still authenticate, but every request it makes fails with a error and an Invalid Credentials message. You must assign the Advertise Stats API MMP Viewer role to your service account before you use its credentials.
403To assign this role, follow these steps from your service account:
-
In the Organization roles section, select + Manage organization roles.
-
Open the User Acquisition category and select Advertise Stats API MMP Viewer.
-
Select Save.
Level Complete events
To meet this validation rule, ensure that you choose No values & no revenue when you map level complete events in your AppsFlyer integration setup.
To configure the included data in your level complete postbacks, follow these steps in the AppsFlyer dashboard:
- Go to Collaborate > Partner Marketplace and search for to open your Unity Ads integration.
Unity Ads - In the Integration tab, go to the In-app event postbacks section.
- Activate the In-app event postbacks toggle.
- In the including column of the mapping table, select No values & no revenue:
Refer to the following example of correct mapping:
AppsFlyer event | mapped to partner event | for users from | including |
|---|---|---|---|
| | All media sources, including organic | No values & no revenue |

No values or revenue in level complete event postbacks
Session events
To meet this validation rule, ensure that you choose No values & no revenue when you map session events in your AppsFlyer integration setup.
To configure the included data in your session event postbacks, follow these steps in the AppsFlyer dashboard:
- Go to Collaborate > Partner Marketplace and search for to open your Unity Ads integration.
Unity Ads - In the Integration tab, go to the In-app event postbacks section.
- Activate the In-app event postbacks toggle.
- In the event row, use the including dropdown to select No values & no revenue:
session
Refer to the following example of correct mapping:
AppsFlyer event | mapped to partner event | for users from | including |
|---|---|---|---|
| | All media sources, including organic | No values & no revenue |
No values or revenue in session event postbacks
Install postbacks
To meet this rule within two days of launching your campaign, your app must have received one install postback in the last 90 days.
Ensure that you configure your Install attribution and Default postbacks settings correctly so your campaigns can receive install postbacks:
- Activate the Share organic/non-organic indication toggle.
- Set the click-through lookback window to 2 days.
- Set the view-through lookback window to 7 days.
- Activate the Install view-through attribution toggle.
- Select for users from > All Media sources in the install event Default postbacks setup.
To activate the Share organic/non-organic indication toggle, follow these steps in the AppsFlyer dashboard:
- Go to Collaborate > Partner Marketplace and search for to open your Unity Ads integration.
Unity Ads - In the Integration tab, go to the General settings section.
- Activate the Share organic/non-organic indication toggle.

Share organic and non-organic
Recommended rule resolutions
To meet the recommended integration rules, refer to the following resolution information.
Unattributed and organic installs
To meet this recommended integration rule, ensure you configure the following sections correctly in your AppsFlyer integration:
- General settings: Activate the Share organic/non-organic indication toggle.
- Default postbacks: Use the for users from dropdown to select All media sources, including organic.
To configure your install postbacks to include all sources, including organic, follow these steps in the AppsFlyer dashboard:
- Go to Collaborate > Partner Marketplace and search for to open your Unity Ads integration.
Unity Ads - In the Integration tab, go to the Default postbacks section.
- In the Install event row, use the for users from dropdown to select All media sources, including organic.

All installs, including organic
Unattributed and organic in-app purchase events
To meet this recommended integration rule, ensure that you send in-app purchase event postbacks for users from All media sources, including organic.
To send in-app purchase event postbacks for users from all sources, including organic, follow these steps in the AppsFlyer dashboard:
- Go to Collaborate > Partner Marketplace and search for to open your Unity Ads integration.
Unity Ads - In the Integration tab, go to the In-app event postbacks section.
- In the row for events, use the for users from dropdown to select All media sources, including organic
purchase

All media sources, including organic
Unattributed and organic ad revenue events
To meet this recommended integration rule, ensure that you send ad revenue event postbacks for users from All media sources, including organic.
To send ad revenue event postbacks for users from all sources, including organic, follow these steps in the AppsFlyer dashboard:
- Go to Collaborate > Partner Marketplace and search for to open your Unity Ads integration.
Unity Ads - In the Integration tab, go to the In-app event postbacks section.
- In the row for events, use the for users from dropdown to select All media sources, including organic
ad_revenue

All media sources, including organic
Unattributed and organic session events
To meet this recommended integration rule, ensure that you send session event postbacks for users from All media sources, including organic.
To send session event postbacks for users from all sources, including organic, follow these steps in the AppsFlyer dashboard:
- Go to Collaborate > Partner Marketplace and search for to open your Unity Ads integration.
Unity Ads - In the Integration tab, go to the In-app event postbacks section.
- In the row for events, use the for users from dropdown to select All media sources, including organic
session

All media sources, including organic
Unattributed and organic level complete events
To meet this recommended integration rule, ensure that you send level complete event postbacks for users from All media sources, including organic.
To send level complete event postbacks for users from all sources, including organic, follow these steps in the AppsFlyer dashboard:
- Go to Collaborate > Partner Marketplace and search for to open your Unity Ads integration.
Unity Ads - In the Integration tab, go to the In-app event postbacks section.
- In the row for events, use the for users from dropdown to select All media sources, including organic
level_complete

All media sources, including organic
Lifetime postback windows
To meet this validation rule with AppsFlyer, set your In-app event postback window to Lifetime.
To set the postback window length to lifetime, follow these steps in the AppsFlyer dashboard:
- Go to Collaborate > Partner Marketplace and search for to open your Unity Ads integration.
Unity Ads - In the Integration tab, go to the In-app event postbacks section.
- Activate the In-app event postbacks toggle.
- Set the In-app event postback window to lifetime.
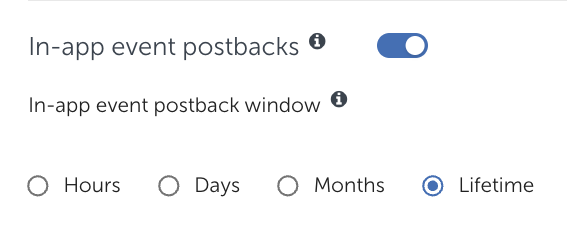
Lifetime postback window