Enable Rendering Layers for Lights in URP
Enable and use Rendering Layers for Lights, change the name of Rendering Layers, and use Custom Shadow Layers to improve shadows.
Read time 3 minutesLast updated 21 days ago
To enable Rendering Layers for Lights in your project:
-
In the URP asset, in the Lighting section, open the More (⋮) menu and select Advanced Properties.
-
In the URP asset, in the Lighting section, select Use Rendering Layers.
How to edit Rendering Layer names
To edit the names of Rendering Layers:
-
Go to> Tags and Layers.Project Settings
?
-
Edit the Rendering Layer names in the Rendering Layers section.
How to use Rendering Layers with Lights
This section describes how to configure the following application example:
-
The scene contains two Point Lights (markedand
Ain the illustration) and two Sphere GameObjects (BandCin the illustration).D -
Lightaffects Sphere
A, but not SphereD. LightCaffects SphereB, but not SphereC.D
The following illustration shows the example:
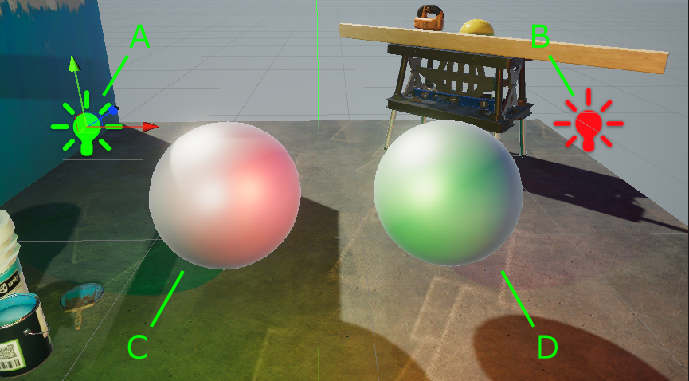
Light A affects Sphere D, but not Sphere C. Light B affects Sphere C, but not Sphere D.
Light affects Sphere , but not Sphere . Light affects Sphere , but not Sphere .
ADCBCDTo implement the example:
-
Enable Rendering Layers in your project.
-
Create two Point Lights (call them, and
A) and two Spheres (call themB, andC). Position the objects so that both Spheres are within the emission range of Lights.D -
Go to Project Settings > Tags and Layers. Rename Rendering Layer 1 to, and Layer 2 to
Red.Green -
Select Light, change its color to green. Select Light
A, change its color to red. With this setup, both Lights affect both Spheres.B
Both Lights affect both Spheres.
-
Make the following settings on Lights and Spheres:Light: in the property Light > Rendering > Rendering Layers, clear all options, and select
A.GreenLight: in the property Light > Rendering > Rendering Layers, clear all options, and selectB.RedSphere: in the property Mesh Renderer > Additional Settings > Rendering Layer Mask, select all options, clearC.GreenSphere: in the property Mesh Renderer > Additional Settings > Rendering Layer Mask, select all options, clearD.RedNow Point Lightaffects SphereA, but not SphereD. Point LightCaffects SphereB, but not SphereC.DPoint Light A affects Sphere D, but not Sphere C. Point Light B affects Sphere C, but not Sphere D.
How to use Custom Shadow Layers
In the illustration above, Light does not affect Sphere , and the Sphere does not cast shadow from Light .
ACAThe Custom Shadow Layers property lets you configure the scene so that Sphere casts the shadow from Light .
CA-
Select Light.
A -
In Light > Shadows, select the Custom Shadow Layers property. Unity shows the Layer property.
-
In the Layer property, select the Rendering Layer that Sphere C belongs to.
Now Light does not affect Sphere , but Sphere casts shadow from Light .
ACCAThe following illustrations show the scene with the Custom Shadow Layers property off and on.

Custom Shadow Layers property off

Custom Shadow Layers property on