Web Player settings
Refer to the UI description of Web Player settings.
Read time 16 minutesLast updated 20 days ago
Use Player settings to know how Unity builds and displays your final Web application. For a description of the general Player settings, refer to Player settings.
To access Web Player settings:
- From the Unity main menu, go to Edit > > Player. The Player settings window appears.Project Settings
?
- Select the Web tab to view the Web Player settings.

Web Player settings
You can find documentation for the properties in the following sections:
For more information about Web Publishing Settings, refer to Web Building and Running.
Resolution and Presentation
Use the Resolution and Presentation section to customize the aspects of the screen's appearance in the Resolution section.
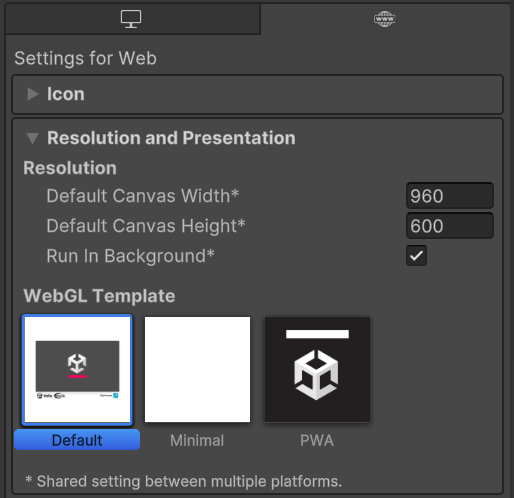
Resolution section for the Web Player platform
Resolution
You can customize the screen mode and default size of the Web canvas element by editing the following options:
Setting | Function |
|---|---|
| Default Canvas Width | Set the width of the Web canvas element. |
| Default Canvas Height | Set the height of the Web canvas element. |
| Run In Background | Enable this option to allow your content to continue to run when the canvas or the browser window loses focus. |
Web template
Select a template to use for your Web Project:
- The Default page is a simple white page with a loading bar on a grey canvas.
- The Minimal page has only the necessary boilerplate code to run the Web content.
- The PWA page has a including a web manifest file and service worker code.Progressive Web App
?
You can use your own template to run your game in an environment similar to the finished game using the instructions in Web templates.
Splash Image
Use the Virtual Reality Splash Image setting to select a custom splash image for XR displays.
Splash Screen
Settings for displaying the splash screen. To configure the splash screen, logos, and background settings in a script, refer to the API reference documentation.
PlayerSettings.SplashScreenProperty | Description |
|---|---|
| Show Splash Screen | Enable or disable the splash screen. |
| Preview | Load a preview of the splash screen in the Game view. The preview reflects the resolution and aspect ratio of the Game view. |
| Splash Style | Choose the color style of the Unity logo.
|
| Animation | Customize how the splash screen appears and disappears on screen.
|
Logos
Settings to customize the logos in your splash screen.
Property | Description |
|---|---|
| Show Unity Logo | Enabled by default. Disable this option to remove the Unity logo from the splash screen. |
| Draw Mode | Select the order in which the logos appear on the splash screen. This setting is available only when Show Unity Logo is enabled.
|
| Logos | Choose the logos to include on the splash screen. Each logo must be a sprite asset. Do the following to update logos:
|
| Logo Duration | Set the length of time each Sprite Asset appears on the screen. Use a value between 2 and 10 seconds. This setting is available only when Draw Mode is All Sequential. |
| Splash Screen Duration | Displays the total duration of all logos in the sequence, in seconds. The splash screen remains on screen for an additional 0.5 seconds before fading out. Note: Your application's splash screen might display for longer if the first scene isn't ready to play. In this case, the splash screen shows only the background image or color and then fades out when the first scene is ready to play. |
Background
Settings to customize the background of your application's splash screen.
Property | Description |
|---|---|
| Overlay Opacity | Adjust how opaque the overlay appears to make the logos stand out. This affects the background color and image color of the logo, based on the Splash Style. Set the opacity to a lower value to reduce this effect. You can also disable the effect by setting it to 0. For example, if the Splash Style is Light on Dark, with a white background, the background becomes gray if the Overlay Opacity is 1, and white if set to 0. Note: The Overlay Opacity setting has an effect on the display of the Background Color and might not match the assigned color. |
| Background Color | Set a color for the splash screen. Unity uses this color if you don't set a Background Image. Note: The Overlay Opacity setting has an effect on the display of the Background Color and might not match the assigned color. |
| Blur Background Image | Enable this setting to blur the background image you set. Disable this setting to display the background image with no blur effect. |
| Background Image | Set a reference to a sprite to use as a background. Unity adjusts the background image by uniformly scaling it until it fits both the width and height of the screen. This means that parts of the image might extend beyond the screen edges in some aspect ratios. To adjust the background image's response to aspect ratio, change the sprite's Position values in the Sprite Editor tab of the Sprite Editor window. Note: Splash screen backgrounds don't support HDR images. Avoid using HDR image formats such as RGBA16 for splash screen background images. |
| Alternate Portrait Image | Set an alternative image for portrait aspect ratios, for example, a mobile device in portrait mode. If you don't assign an Alternate Portrait Image sprite, the Unity Editor uses the sprite assigned as the Background Image for both portrait and landscape mode. You can adjust the position and dimensions of the sprite in the Sprite Editor to control the aspect ratio and position of the background image on the splash screen. |
Other Settings
This section allows you to customize a range of options organized into the following groups:
Rendering
Use these settings to customize how Unity renders your game for the Web platform.
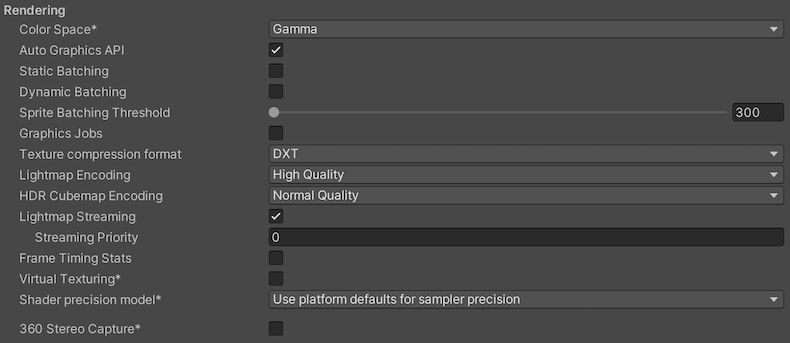
Rendering Player settings for the Web platform
Property | Description |
|---|---|
Color Space | Choose which color space to use for rendering. For more information, refer to Color spaces.
|
Auto Graphics API | Enables the default Web graphics API (WebGL 2.0). By default, this option is enabled. Disable this option to manually pick and reorder the graphics APIs. |
Static Batching | Enable this option to use static batching. |
Dynamic Batching | Use Dynamic Batching on your build (enabled by default). Note: Dynamic batching has no effect when a Scriptable Render Pipeline is active, so this setting is only visible if the Scriptable Render Pipeline Asset Graphics setting is blank. |
Graphics Jobs (Experimental) | Enable this option to instruct Unity to offload graphics tasks (render loops) to worker threads running on other CPU cores. This is intended to reduce the time spent in |
Texture compression format | Choose DXT, ETC2, or ASTC to set the texture compression format for the Web platform. For information on how to pick the right format, refer to Texture compression format overview. To create builds for desktop and mobile browsers from a script, refer to Texture Compression in Web. |
Lightmap Encoding | Defines the encoding scheme and compression format of the lightmaps. You can choose from Low Quality, Normal Quality, or High Quality |
HDR Cubemap Encoding | Defines the encoding scheme and compression format of the HDR Cubemaps. You can choose from Low Quality, Normal Quality, or High Quality. For more information, refer to Lightmaps: Technical information. |
Lightmap Streaming | Enable this option to use Mipmap Streaming for lightmaps. Unity applies this setting to all lightmaps when it generates them. Note: To use this setting, you must enable the Texture Mipmap Streaming Quality setting. |
Streaming Priority | Set the priority for all lightmaps in the Mipmap Streaming system. Unity applies this setting to all lightmaps when it generates them. Positive numbers give higher priority. Valid values range from |
Frame Timing Stats | Enable this property to gather CPU and GPU frame timing data using FrameTimingManager API. If you disable this property, Dynamic Resolution camera setting can't use this data to dynamically adjust the resolution to reduce GPU workload. |
Virtual Texturing (Experimental) | Reduce GPU memory usage and texture loading times if your Scene has many high resolution textures. For more information, refer to Virtual Texturing. Note: The Unity Editor requires a restart for this property to take effect. |
Shader Precision Model | Select the default precision of samplers and the definition of |
360 Stereo Capture | Indicate whether Unity can capture stereoscopic 360 images and videos. When enabled, Unity compiles additional shader variants to support 360 capture (currently only on Windows/OSX). The |
Configuration

Configuration settings for the Web platform
Property | Description |
|---|---|
Scripting Backend | Choose the scripting backend you want to use. The scripting backend determines how Unity compiles and executes C# code in your Project.
|
API Compatibility Level | Choose which .NET APIs you can use in your project. This setting can affect compatibility with third-party libraries. However, it has no effect on Editor-specific code (code in an Editor directory, or within an Editor-specific Assembly Definition). Tip: If you're having problems with a third-party assembly, you can try the suggestion in the API Compatibility Level section.
|
Editor Assemblies Compatibility Level | Select which .NET APIs to use in your Editor assemblies.
|
IL2CPP Code Generation | Defines how Unity manages IL2CPP code generation. Note: To use this, set Scripting Backend to IL2CPP. |
C++ Compiler Configuration | Choose the C++ compiler configuration used when compiling IL2CPP generated code.
|
Use incremental GC | Uses the incremental garbage collector, which spreads garbage collection over several frames to reduce garbage collection-related spikes in frame duration. For more information, refer to Automatic Memory Management. |
Allow downloads over HTTP | Indicate whether to allow downloading content over HTTP. The default option is Not allowed due to the recommended protocol being HTTPS, which is more secure.
|
Active Input Handling | Choose how to handle input from users.
|
Shader Variant Loading
Use these settings to control how much memory shaders use at runtime.
Property | Description |
|---|---|
| Default chunk size (MB) | Sets the maximum size of compressed shader variant data chunks Unity stores in your built application for all platforms. The default is |
| Default chunk count | Sets the default limit on how many decompressed chunks Unity keeps in memory on all platforms. The default is |
| Override | Enables overriding Default chunk size and Default chunk count for this build target. |
| Chunk size (MB) | Overrides the value of Default chunk size (MB) on this build target. |
| Chunk count | Overrides the value of Default chunk count on this build target. |
API Compatibility Level
You can choose your mono API compatibility level for all targets. Sometimes a third-party .NET library uses functionality that's outside of your .NET compatibility level. To understand what is going on in such cases, and how to best fix it, try following these suggestions:
- Install ILSpy for Windows.
- Drag the .NET assemblies for the API compatibility level that you're having issues with into ILSpy. You can find the problematic files under .
Frameworks/Mono/lib/mono/YOURSUBSET/ - Drag in your third-party assembly.
- Right-click your third-party assembly and select Analyze.
- In the analysis report, inspect the Depends on section. The report highlights anything that the third-party assembly depends on, but that's not available in the .NET compatibility level of your choice in red.
Script Compilation
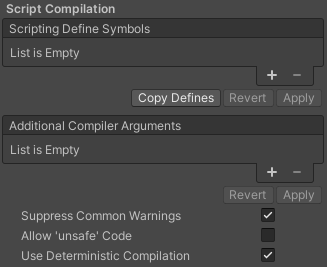
Script compilation settings for the Web platform
Property | Description |
|---|---|
| Scripting Define Symbols | Sets custom compilation flags. For more details, refer to Platform dependent compilation. |
| Additional Compiler Arguments | Specifies additional arguments to pass to the Roslyn C# compiler. Enter one valid compiler argument per list entry. To create a new entry, select Add (+). To remove an entry, select Remove (-). Select Apply to include newly added arguments in future compilations. Select Revert to reset the list to the most recent applied state. Arguments must use the You can also supply additional command-line arguments to the C# compiler with a |
| Suppress Common Warnings | Indicates whether to display the C# warnings CS0169 and CS0649. |
| Allow 'unsafe' Code | Enables support for compiling ‘unsafe’ C# code in a pre-defined assembly (for example, For Assembly Definition Files ( |
| Use Deterministic Compilation | Indicates whether to prevent compilation with the For more information, refer to C# Compiler Options that control code generation. |
Optimization

Optimization settings for the Web platform
Property | Description |
|---|---|
Prebake Collision Meshes | Adds collision data to Meshes at build time. |
Preloaded Assets | Sets an array of Assets for the player to load on startup. To add new Assets, increase the value of the Size property and then set a reference to the Asset to load in the new Element box that appears. |
Strip Engine Code | Enable this option if you want the Unity Linker tool to remove code for Unity Engine features that your Project doesn’t use. This setting is only available with the IL2CPP scripting backend. Most apps do not use every available DLL. This option strips out DLLs that your app doesn’t use to reduce the size of the built Player. If your app is using one or more classes that would normally be stripped out under your current settings, Unity displays a debug message when you try to build the app. |
Managed Stripping Level | Choose how aggressively Unity strips unused managed (C#) code. When Unity builds your app, the Unity Linker process can strip unused code from the managed DLLs your Project uses. Stripping code can make the resulting executable smaller, but can sometimes remove code that's in use. For more information about these options and bytecode stripping with IL2CPP, refer to ManagedStrippingLevel.
|
Enable Internal Profiler (Deprecated) | This feature is deprecated and will be retired in a future version of Unity. Use the Profiler window instead (menu: Window > Analytics > Profiler). The Profiler collects application performance data and prints a report to the console. The report contains the number of milliseconds each Unity subsystem takes to execute on each frame, averaged across 30 frames. |
Vertex Compression | Sets vertex compression per channel. This affects all the meshes in your project. Typically, Vertex Compression is used to reduce the size of mesh data in memory, reduce file size, and improve GPU performance. For more information on how to configure vertex compression and limitations of this setting, refer to Compressing mesh data. |
Optimize Mesh Data | Enable this option to strip unused vertex attributes from the mesh used in a build. This option reduces the amount of data in the mesh, which can help reduce build size, loading times, and runtime memory usage. Warning: If you have this setting enabled, don't change material or shader settings at runtime. For more information, refer to PlayerSettings.stripUnusedMeshComponents. |
Texture Mipmap Stripping | Enables mipmap stripping for all platforms. It strips unused mipmap levels from Textures at build time. Unity determines unused mipmap levels by comparing the mipmap level against the quality settings for the current platform. If a mipmap level is excluded from every quality setting for the current platform, then Unity strips those mipmap levels from the build at build time. If |
Stack Trace
Select the logging settings for the Web platform.

Logging settings for the Web platform
Select your preferred stack trace method by enabling the option that corresponds to each Log Type (Error, Assert, Warning, Log, and Exception) based on the type of logging you require. For more information, refer to stack trace logging.
Property | Description |
|---|---|
| None | No logs are ever recorded. |
| ScriptOnly | Logs only when running scripts. |
| Full | Logs all the time. |
Legacy
Enable the Clamp BlendShapes (Deprecated) option to clamp the range of blend shape weights in Skinned Mesh Renderers.

Legacy settings for the Web platform
Publishing settings
Use the Publishing Settings to configure how Unity builds your Web platform application. For example, you can choose to enable the browser cache to store its files in your build.

Publishing settings for the Web platform
Property | Description |
|---|---|
| Compression Format | Choose the compression format to use for release build files. The options are: Gzip, Brotli, and Disabled (none). This option doesn't affect development builds. |
| Name Files As Hashes | Enable this option to use an MD5 hash of the uncompressed file contents as a file name for each file in the build. |
| Data caching | Enable this option to automatically cache your contents Asset data on the user's machine so it doesn't have to be re-downloaded on subsequent runs (unless the contents have changed). Caching is implemented using the IndexedDB API provided by the browser. Some browsers might implement restrictions around this, such as asking the user for permission to cache data over a specific size. |
| Debug Symbols | Select from the available options to specify how debug symbols are added in your build.
|
| Decompression Fallback | Include decompression fallback code for build files in the loader. Use this option if you're unable to configure server response headers according to the selected compression method. |
| Power Preference | Set a preference for which GPU to use when rendering on a multi-GPU device. Note that the browser might ignore this preference.
|
WebAssembly Language Features
Use this section to customize the WebAssembly language features for your Web application.
Property | Description |
|---|---|
| Enable Exceptions | Choose how to handle unexpected code behavior (generally considered errors) at runtime.
|
| Enable Native C/C++ Multithreading | Enable this option to use the native Unity C/C++ engine code that targets WebAssembly/This setting doesn't enable multithreading C# code, as that requires further advances to the WebAssembly language standard. It's recommended to disable this option and use it only for evaluating future web features. |
| Enable WebAssembly 2023 | If enabled, the generated WebAssembly code targets WebAssembly 2023, which is a Unity-coined name for a selection of newer WebAssembly language features. These features include: sign-extension opcodes, non-trapping fp-to-int instructions, bulk memory, JS BigInt integration, |
| Use WebAssembly.Table | Enable this option if you want the Web build to target the Note: |
| Enable BigInt | Enable this option to target the Note: The Wasm BigInt feature requires at least Chrome 85 (Aug 25, 2020), Firefox 78 (Jun 30, 2020), Safari 14.5 (Apr 26, 2021), or newer. |
| Initial Memory Size | The initial size of the WASM heap memory in megabytes (MB). By default, this is set to 32 MB. If Memory Growth Mode is set to None, then this is also the maximum size of WASM heap memory. |
| Memory Growth Mode | Choose the growth mode for the WASM heap memory from the following options. The recommended option is Geometric.
|
| Maximum Memory Size | The maximum size of the WASM heap memory in MB. By default, this is set to 2048 MB, which is the recommended setting. You can enter a memory size up to 4096 MB, but there are known Firefox and Chrome bugs for builds over 2048 MB. This option is only available for the Memory Growth Mode Linear or Geometric. |
| Linear Memory Growth Step | Advanced tuning option to control the WASM heap growth step in MB. By default, this is set to 16 MB. A growth step of 16 MB indicates that the heap is increased by 16 MB each time it needs to grow. Only available if Memory Growth Mode is set to Linear. |
| Geometric Memory Growth Step | Advanced tuning option to control the WASM heap growth factor relative to the current heap size. By default, this is set to 0.2. A growth factor of 0.2 means that the size of the heap is increased by 0.2 * currentHeapSize each time the heap needs to grow. Only available if Memory Growth Mode is set to Geometric. |
| Geometric Memory Growth Cap (MB) | Advanced tuning option to control the upper limit for a heap growth step in MB. By default, this is set to 96 MB. A growth cap of 96MB means that the size of the heap is increased by at most 96 MB. Only available if Memory Growth Mode is set to Geometric. |
Show Diagnostic Overlay setting
To help optimize Web builds and diagnose potential problems, you can view diagnostics information (currently limited to memory usage) by enabling this setting. Once enabled, an icon appears on the build that displays an overlay with data about the build. It's available for both Development and Release builds.
-
To view the diagnostics information, enable the Show Diagnostics Overlay option in the Player settings window (File > Build Profiles > Player Settings > Publishing Settings).On desktop, the Diagnostics icon appears on the footer of the Web canvas:

Diagnostics button on the footer of the canvas
On a mobile device, the Diagnostics icon appears on the bottom-right of the screen:
An Android phone displaying the diagnostics button
-
Click the Diagnostics icon. An overlay appears showing the JavaScript memory, which is further broken down to display WASM heap memory usage:

The Diagnostics overlay shows the JavaScript memory distribution and the WASM heap memory usage
The following diagnostics appear on the overlay screen:
Property | Function |
|---|---|
| Total JS Memory | The current size of the JavaScript (JS) heap, including unused memory not allocated to any JS objects in megabytes.
|
| Total WASM heap memory | Linear memory representing the entire heap of the C/C++ Unity engine that's compiled with Emscripten, including unallocated memory in megabytes.
|
| Page Load Time to First Frame | The total time from the beginning of page load until the first application frame rendering is complete in milliseconds.
|
| Average FPS (10 s) | The average of last 10 frames per second.
|
| Number of Frame Stalls | The number of rendered frames that took unusually long to complete compared to their previous frames. |
Important note about JS Memory
The JS Memory information is obtained using the performance.memory API, which is currently only supported on Chrome or Edge. There are no other APIs available that return this information for Safari or Firefox.
On browsers where this API isn't supported, a message showing N/A appears.

A N/A message appears on browsers that don't support performance.memory API