ドキュメント

​
​

Development

User Acquisition

Monetization

産業

Vivox Core SDK

Vivox Core SDK

このページは選択した言語では使用できません。
Vivox
​
​
Vivox Core SDK
  • Overview
  • Before you begin
  • Get started
  • Release notes
  • Developer Guide
    • Client SDK basics
    • Channels
      • Channel name criteria
      • Channel types
      • Echo channels
      • Positional channels
      • Volume differences
      • Channel identifiers for large scale games
      • Participant events
      • Channel webhooks
      • Join a channel
      • Leave a channel
      • Kick a user from a channel
      • Manage session groups
      • Audio injection
      • Methods for setting audio levels
      • Derumbler
      • Automatic connection recovery
    • Presence management
    • Messaging
    • Manage audio
    • Couch co-op
    • Android app development
    • iOS app development
    • macOS app development
    • Windows app development
    • Real-time recording
    • Speech-to-text audio transcription
    • Text-to-speech
    • Troubleshooting
  • Reference
  • Privacy overview
  1. Vivox Core SDK documentation

Volume differences

Learn about voice channels in Vivox Core.
読み終わるまでの所要時間 2 分
最終更新 8ヶ月前

Positional channels have lower default volume settings than 2D channels. 3D channels are a third quieter than 2D channels.
This difference is by design. Positional channels need more headroom for sound to be stereo panned, so they initialize with a lower level.
Positional channels are set to -6dB. This allows positional channels to adjust when panned hard left or right while maintaining volume dynamically.
For context on decibel levels, -10dB is what most listeners perceive as “half as loud”.
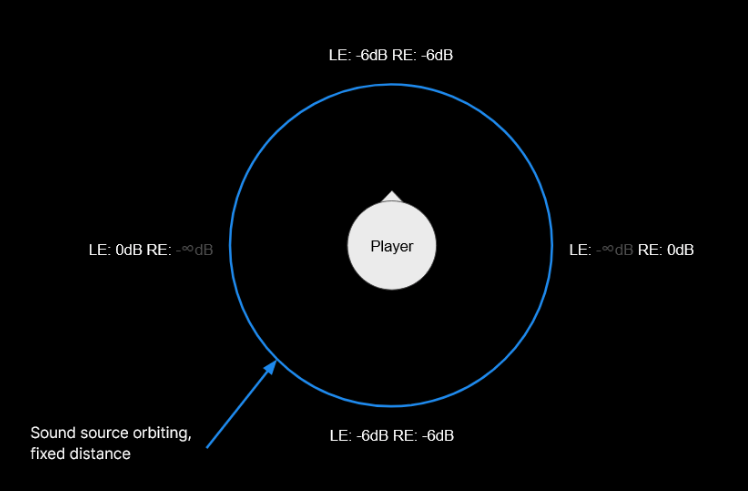
An image with a player circle in the middle of a larger circle labled Sound source, which orbits the player.

Equalizing channels

It’s possible to match channel loudness by lowering the loudness in 2D channels to the base level of 3D channels. It’s important to note that each 2D channel needs to be lowered individually every time they’re joined or re-joined. There isn’t a universal setting to manage all 2D channels at once.
Another approach is to raise the audio in the 3D channel by 6dB to match the volume of 2D channels.
If you choose to equalize the volumes between channel types, the main thing to keep in mind with these volume changes is that you need to manage individual volume boosting as the changes made are increasing the channel-wide volumes already. It’s best to not allow users to increase the volume to a level that could be harmful.
To set the volume level of an entire individual channel, use
vx_req_session_set_local_render_volume
. If you choose to raise the level of 3D channels set them to 56. If you choose to lower 2D channels to match the default 3D channel volume instead, set 2D channels to 44.
注
If you boost the 3D channel default volume to match the 2D channel, test the max user volume levels. If users have control over local capture or render volume settings, test against the upper guidelines and consider lowering the maximum to which they can raise their volume. If users have control over other participants' volume levels, remember to test those as well.
For more information on managing local volume settings, refer to In-game control of audio levels.

Copyright © 2026 Unity Technologies
法規事項プライバシーポリシークッキーDocumentation Terms of Use私の個人情報を販売または共有しないプライバシーに関する選択 (クッキー設定)

"Unity" の名称、Unity のロゴ、およびその他の Unity の商標は、米国およびその他の国における Unity Technologies またはその関係会社の商標または登録商標です (詳しくはこちら)。その他の名称またはブランドは該当する所有者の商標です。

一部のページは利便性向上のため機械翻訳を使用しており、内容に不正確な表現が含まれる場合があります。内容に齟齬または不一致が生じた場合は、英語版を正本とします。

  • このページ
    • Equalizing channels


このページの問題を報告する