Get started with runtime binding
Learn the basics of runtime binding from an example.
Read time 3 minutesLast updated a month ago
Version: 6000.0+
Want to learn how to create runtime data binding? Use this example to get started. This example creates a data source asset and uses UI Builder to bind the data source to a UI.
To set a runtime binding in UI Builder:
- Define the data source and the data source path in the Inspector panel of the UI control.
- Bind the properties of the UI control to the properties of the data source asset.
- Define the binding mode to configure how changes are replicated between the data source and the UI.
- Define the update trigger to configure when changes are replicated between the data source and the UI.
Example overview
This example creates a data source asset that contains a string property, and binds it to the Text property of a Label control in UI Builder. When you change the string property in the data source asset, the text of the label changes.
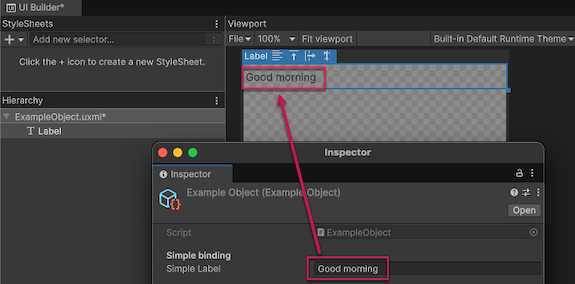
Runtime binding example
You can find the completed files that this example creates in this GitHub repository.
Prerequisites
This guide is for developers familiar with the Unity Editor, UI Toolkit, and C# scripting. Before you start, get familiar with the following:
Create a data source asset
Create a data source asset that contains the properties you want to bind to. In this example, you create a asset named that contains a property.
ScriptableObjectExampleObjectstring- Create a project in Unity with any template.
- In the folder of your project, create a C# script named
Assetswith the following content:ExampleObject.cs
using Unity.Properties;using UnityEngine;using UnityEngine.UIElements;#if UNITY_EDITORusing UnityEditor;#endif[CreateAssetMenu]public class ExampleObject : ScriptableObject{ [Header("Simple binding")] [CreateProperty] public string simpleLabel = "Hello World!";}
Create the example object asset
- From the menu, select Assets > Create > Example Object. This creates an asset in the folder of your project.
Assets - Rename the asset as .
ExampleObject.asset
Create the UI
Create a UI that binds to the data source asset you created in the previous step. In this example, you create a UXML file that contains a Label.
- In the folder of your project, create a UXML file named
Assets.ExampleObject.uxml - Double-click the file to open it in UI Builder.
ExampleObject.uxml - In the Hierarchy panel, add a Label control.
Bind a Label to the data source
Bind the UI to the data source asset you created in the previous step.
-
In the Inspector panel of the Label, from the Bindings > Data Source > Object list, select ExampleObject.
-
In the Data Source Path list, select simpleLabel.
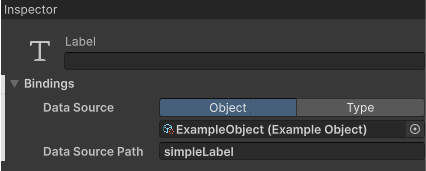
Set the VisualElement binding data source
-
Right-click the Text property and select Add binding.

Add binding
-
From the Binding Mode list, select To Target. This updates the UI when the data source changes.
-
From the Advanced Settings > Update Trigger list, select On Source Changed, which is the default setting. This updates the UI when the data source changes.

Set the binding mode and update trigger
-
Select Add binding to apply your changes.
-
Save and close UI Builder. Yourfile looks like the following:
ExampleObject.uxml
<engine:UXML xmlns:xsi="http://www.w3.org/2001/XMLSchema-instance" xmlns:engine="UnityEngine.UIElements" xmlns:editor="UnityEditor.UIElements" noNamespaceSchemaLocation="../../UIElementsSchema/UIElements.xsd" editor-extension-mode="False"> <engine:Label text="Label" data-source="ExampleObject.asset" data-source-path="simpleLabel"> <Bindings> <engine:DataBinding property="text" binding-mode="ToTarget" /> </Bindings> </engine:Label></engine:UXML>
Test the binding in UI Builder preview mode
Update the label text in the data source asset and check changes replicated in the UI.
- In the folder of your project, select
Assets.ExampleObject.asset - In the Inspector window, in the Simple Label field, enter text. The Label text in the UI Builder Viewport displays the text you entered.