UWP Player settings
Refer to the UI description of UWP Player settings.
Read time 26 minutesLast updated 8 days ago
To access the Universal Windows Platform (UWP) Player settings, go to Edit > > Player from the main menu in Unity. Use the Player settings to determine how Unity builds and displays your final application. For a description of the general Player settings, refer to Player Settings.
Project Settings
?

Player settings for UWP
Documentation for the properties is grouped according to their respective sections in the Player UI:
Icon
Use the Icon settings to customize the branding for your app on the Microsoft Store.

Icon Settings
The Icon section displays warnings for any images that are required for certification but haven’t been assigned. A UWP application must specify icon and logo images as part of the package before you can submit it to the Microsoft Store.
Expand the Store Logo section to specify the image that appears on the Store description page for the application. You can add up to eight different resolutions.
Tile
Customize the general appearance of your Microsoft Store tiles with these settings:
Property | Description |
|---|---|
Short name | Sets an abbreviated name for the app. |
Show name on | Indicates each icon image you want the name to appear on: Medium Tile, Large Tile, or Wide Tile. |
Foreground text | Chooses whether to use Light or Dark text on the app's Tile. |
Background color | Specifies what color to use for the background. |
Default Size | Chooses which size you want to use as the default size for the Tile.
|
Unity copies these options directly to the file.
Package.appxmanifestTiles and Logos
Specify the images your tiles display on the Microsoft Store with these settings:
Property | Description |
|---|---|
| Square 44x44 Logo | Set a 44x44 logo image to use on the app's tile. You can set up to 10 resolutions. |
| Square 71x71 Logo | Set a 71x71 logo image to use on the app's tile. You can set up to 5 resolutions. |
| Square 150x150 Logo | Set a 150x150 logo image to use on the app's tile. You can set up to 5 resolutions. |
| Square 310x310 Logo | Set a 310x310 logo image to use on the app's tile. You can set up to 5 resolutions. |
| Wide 310x150 Logo | Set a 310x150 logo image to use on the app's tile. You can set up to 5 resolutions. |
Resolution and Presentation
Use the Resolution and Presentation section to customize aspects of the screen's appearance.

Resolution and Presentation settings
Property | Description |
|---|---|
| Default is Full Screen | Sets the app window to the full-screen native display resolution, covering the whole screen. This mode is also known as borderless full-screen. Unity renders the app content at the resolution set by a script, or the native display resolution if none is set and scales it to fill the window. When scaling, Unity adds black bars to the rendered output to match the display aspect ratio to prevent content stretching. This process is called letterboxing. |
| Run In Background | Indicates whether to keep the game running (rather than pausing) if the app loses focus. |
| Allow Fullscreen Switch | Indicates whether to allow default OS full-screen key presses to toggle between full-screen and windowed modes. |
| Transparent Swapchain | Indicates whether to set AlphaMode on the swap chain to DXGI_ALPHA_MODE_PREMULTIPLIED. This setting is used only for UWP projects that use the XAML build type. By enabling this setting, you can compose Unity content with other XAML content in your application. For more information, refer to PlayerSettings.WSA.transparentSwapchain. |
Orientation
Property | Description |
|---|---|
Default Orientation | Specify the orientation of the application window within the device's screen. Note: Unity shares the value you set for this setting between Android, iOS, and UWP.
|
Allowed Orientations for Auto Rotation
Use the Allowed Orientations for Auto Rotation section to specify which orientations the application supports when you set Default Orientation to Auto Rotation. This is useful, for example, to lock the application to landscape orientation but allow the user to change between landscape left and landscape right.
Property | Description |
|---|---|
Portrait | Allow portrait orientation with the bottom of the application aligned with the bottom of the screen. |
Portrait Upside Down | Allow portrait orientation with the bottom of the application aligned with the top of the screen. |
Landscape Right | Allow landscape orientation with the right side of the application aligned with the top of the screen. |
Landscape Left | Allow landscape orientation with the left side of the application aligned with the top of the screen. |
Splash Image
Use the Virtual Reality Splash Image property to select a custom splash image for Virtual Reality displays.
Splash Screen
Settings for displaying the splash screen. To configure the splash screen, logos, and background settings in a script, refer to the API reference documentation.
PlayerSettings.SplashScreenProperty | Description |
|---|---|
| Show Splash Screen | Enable or disable the splash screen. |
| Preview | Load a preview of the splash screen in the Game view. The preview reflects the resolution and aspect ratio of the Game view. |
| Splash Style | Choose the color style of the Unity logo.
|
| Animation | Customize how the splash screen appears and disappears on screen.
|
Logos
Settings to customize the logos in your splash screen.
Property | Description |
|---|---|
| Show Unity Logo | Enabled by default. Disable this option to remove the Unity logo from the splash screen. |
| Draw Mode | Select the order in which the logos appear on the splash screen. This setting is available only when Show Unity Logo is enabled.
|
| Logos | Choose the logos to include on the splash screen. Each logo must be a sprite asset. Do the following to update logos:
|
| Logo Duration | Set the length of time each Sprite Asset appears on the screen. Use a value between 2 and 10 seconds. This setting is available only when Draw Mode is All Sequential. |
| Splash Screen Duration | Displays the total duration of all logos in the sequence, in seconds. The splash screen remains on screen for an additional 0.5 seconds before fading out. Note: Your application's splash screen might display for longer if the first scene isn't ready to play. In this case, the splash screen shows only the background image or color and then fades out when the first scene is ready to play. |
Background
Settings to customize the background of your application's splash screen.
Property | Description |
|---|---|
| Overlay Opacity | Adjust how opaque the overlay appears to make the logos stand out. This affects the background color and image color of the logo, based on the Splash Style. Set the opacity to a lower value to reduce this effect. You can also disable the effect by setting it to 0. For example, if the Splash Style is Light on Dark, with a white background, the background becomes gray if the Overlay Opacity is 1, and white if set to 0. Note: The Overlay Opacity setting has an effect on the display of the Background Color and might not match the assigned color. |
| Background Color | Set a color for the splash screen. Unity uses this color if you don't set a Background Image. Note: The Overlay Opacity setting has an effect on the display of the Background Color and might not match the assigned color. |
| Blur Background Image | Enable this setting to blur the background image you set. Disable this setting to display the background image with no blur effect. |
| Background Image | Set a reference to a sprite to use as a background. Unity adjusts the background image by uniformly scaling it until it fits both the width and height of the screen. This means that parts of the image might extend beyond the screen edges in some aspect ratios. To adjust the background image's response to aspect ratio, change the sprite's Position values in the Sprite Editor tab of the Sprite Editor window. Note: Splash screen backgrounds don't support HDR images. Avoid using HDR image formats such as RGBA16 for splash screen background images. |
| Alternate Portrait Image | Set an alternative image for portrait aspect ratios, for example, a mobile device in portrait mode. If you don't assign an Alternate Portrait Image sprite, the Unity Editor uses the sprite assigned as the Background Image for both portrait and landscape mode. You can adjust the position and dimensions of the sprite in the Sprite Editor to control the aspect ratio and position of the background image on the splash screen. |
The Splash Image settings for UWP include the following additional sections:
Windows
Set the foreground image to use in your app's splash screen. You can add up to seven different resolutions.

Windows Splash settings
Overwrite background color
While your application initializes, UWP shows a Splash screen that appears before the Made with Unity Splash screen. It's best practice to match the UWP Splash screen background to the Splash screen image because it's more visually appealing. The default color is black.
To overwrite the UWP specific Splash screen background color:
- Go to > Splash Screen and enable Overwrite Background Color.Player Settings
?
- Choose a color from the Background Color selector.
If you overwrite the default background color, Unity changes the color value in the application manifest. If you are using the XAML application type, Unity also sets the color value in the initial XAML page.

Overwrite background color Splash settings
Other Settings
This section allows you to customize a range of options organized into the following groups:
- Rendering
- Configuration
- Shader Settings
- Shader Variant Loading Settings
- Optimization
- Stack Trace
- Legacy
Rendering
Use these settings to customize how Unity renders your game for UWP.

Rendering settings
Property | Description |
|---|---|
Color Space | Choose which color space to use for rendering. For more information, refer to Color spaces.
|
MSAA Fallback | Select the multi sample antialiasing fallback strategy to upgrade or downgrade the sample count if the sample count requested by the user is not supported by the device.
|
Auto Graphics API | Indicates whether to manually pick and reorder the graphics APIs. By default this option is enabled, and Unity uses Direct3D11. |
Static Batching | Enable this option to use static batching. |
Sprite Batching Threshold | Controls the maximum vertex threshold used when batching. |
GPU Compute Skinning | Indicates whether to use DX11/DX12/ES3 GPU skinning. |
Graphics Jobs | Offload graphics tasks (render loops) to worker threads running on other CPU cores. This option reduces the time spent in |
Lightmap Encoding | Defines the encoding scheme and compression format of the lightmaps. You can choose from Low Quality, Normal Quality, or High Quality |
HDR Cubemap Encoding | Defines the encoding scheme and compression format of the HDR Cubemaps. You can choose from Low Quality, Normal Quality, or High Quality. For more information, refer to Lightmaps: Technical information. |
Lightmap Streaming | Enable this option to use Mipmap Streaming for lightmaps. Unity applies this setting to all lightmaps when it generates them. Note: To use this setting, you must enable the Texture Mipmap Streaming Quality setting. |
Streaming Priority | Set the priority for all lightmaps in the Mipmap Streaming system. Unity applies this setting to all lightmaps when it generates them. Positive numbers give higher priority. Valid values range from |
Frame Timing Stats | Enable this property to gather CPU and GPU frame timing data using FrameTimingManager API. If you disable this property, Dynamic Resolution camera setting can't use this data to dynamically adjust the resolution to reduce GPU workload. |
Allow HDR Display Output | Enable HDR mode output when the application runs. This only works on displays that support this feature. If the display doesn’t support HDR mode, the game runs in standard mode. |
Use HDR Display Output | Checks if the main display supports HDR, and if it does, swaps to HDR output when the application launches. |
Swap Chain Bit Depth | Select the number of bits in each color channel for swap chain buffers. For more information on bit depth, refer to D3DHDRDisplayBitDepth. Note: This setting is visible only when Use HDR Display Output is enabled.
|
Virtual Texturing (Experimental) | Reduce GPU memory usage and texture loading times if your Scene has many high resolution textures. For more information, refer to Virtual Texturing. Note: The Unity Editor requires a restart for this property to take effect. |
360 Stereo Capture | Indicate whether Unity can capture stereoscopic 360 images and videos. When enabled, Unity compiles additional shader variants to support 360 capture (currently only on Windows/OSX). The |
Load/Store Action Debug Mode | Highlights undefined pixels that might cause rendering problems on mobile platforms. This affects the Unity Editor Game view, and your built application if you select Development Build in the Platform Settings section of the Build Profiles window. For more information, refer to LoadStoreActionDebugModeSettings. |
Editor Only | Indicates whether the Load/Store Action Debug Mode only runs in the Unity Editor. |
Configuration

Configuration settings
Property | Description |
|---|---|
Scripting Backend | The scripting backend determines how Unity compiles and executes C# code in your Project. This setting defaults to IL2CPP for Universal Windows Platform and can’t be changed. |
API Compatibility Level | Choose which .NET APIs you can use in your project. This setting can affect compatibility with third-party libraries. However, it has no effect on Editor-specific code (code in an Editor directory, or within an Editor-specific Assembly Definition). Tip: If you're having problems with a third-party assembly, you can try the suggestion in the API Compatibility Level section.
|
Editor Assemblies Compatibility Level | Select which .NET APIs to use in your Editor assemblies.
|
IL2CPP Code Generation | Defines how Unity manages IL2CPP code generation.
|
C++ Compiler Configuration | Chooses the C++ compiler configuration used when compiling IL2CPP generated code. Note: This property is disabled for the Universal Windows Platform because it's chosen in the generated Visual Studio project. |
IL2CPP Stacktrace Information | Choose the information to include in a stack trace. For further details on the information types, refer to Managed stack traces with IL2CPP.
|
Use incremental GC | Uses the incremental garbage collector, which spreads garbage collection over several frames to reduce garbage collection-related spikes in frame duration. For more information, refer to Automatic Memory Management. |
Allow downloads over HTTP | Indicate whether to allow downloading content over HTTP. The default option is Not allowed due to the recommended protocol being HTTPS, which is more secure.
|
Accelerometer Frequency | Defines how often to sample the accelerometer. If you choose Disabled, then no samples are taken. Otherwise, you can choose from 15Hz, 30Hz, 60Hz and 100Hz frequencies. |
Active Input Handling | Choose how to handle input from users.
|
API Compatibility Level
You can choose your mono API compatibility level for all targets. Sometimes a third-party .NET library uses functionality that's outside of your .NET compatibility level. To understand what's going on in such cases, and how to best fix it, try following these suggestions:
- Install ILSpy for Windows.
- Drag the .NET assemblies for the API compatibility level that you are having issues with into ILSpy. You can find these under .
Data/MonoBleedingEdge/lib/mono/YOURSUBSET/ - Drag in your third-party assembly.
- Right-click your third-party assembly and select Analyze.
- In the analysis report, inspect the Depends on section. The report highlights anything that the 3rd-party assembly depends on, but that's not available in the .NET compatibility level of your choice in red.
Shader Settings
Property | Description |
|---|---|
Shader Precision Model | Select the default precision shaders use. For more information, refer to Use 16-bit precision in shaders.
|
Strict shader variant matching | Enable this option to use the error shader for rendering if a shader variant is missing in the Player build and display an error in the console. The error specifies the shader, subshader index, pass, and keywords used for shader variant search |
Keep Loaded Shaders Alive | Keep all loaded shaders alive and prevent unloading. |
Shader Variant Loading Settings
Use these settings to control how much memory shaders use at runtime.
Property | Description |
|---|---|
| Default chunk size (MB) | Sets the maximum size of compressed shader variant data chunks Unity stores in your built application for all platforms. The default is |
| Default chunk count | Sets the default limit on how many decompressed chunks Unity keeps in memory on all platforms. The default is |
| Override | Enables overriding Default chunk size and Default chunk count for this build target. |
| Chunk size (MB) | Overrides the value of Default chunk size (MB) on this build target. |
| Chunk count | Overrides the value of Default chunk count on this build target. |
Script Compilation
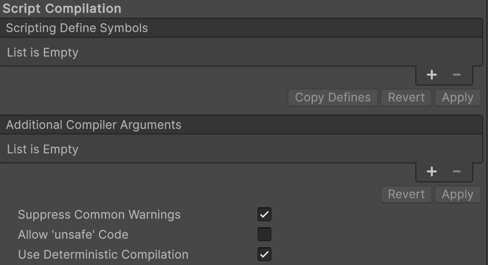
Script Compilation settings
Property | Description |
|---|---|
| Scripting Define Symbols | Sets custom compilation flags. For more details, refer to Platform dependent compilation. |
| Additional Compiler Arguments | Specifies additional arguments to pass to the Roslyn C# compiler. Enter one valid compiler argument per list entry. To create a new entry, select Add (+). To remove an entry, select Remove (-). Select Apply to include newly added arguments in future compilations. Select Revert to reset the list to the most recent applied state. Arguments must use the You can also supply additional command-line arguments to the C# compiler with a |
| Suppress Common Warnings | Indicates whether to display the C# warnings CS0169 and CS0649. |
| Allow 'unsafe' Code | Enables support for compiling ‘unsafe’ C# code in a pre-defined assembly (for example, For Assembly Definition Files ( |
| Use Deterministic Compilation | Indicates whether to prevent compilation with the For more information, refer to C# Compiler Options that control code generation. |
Optimization

Optimization Settings
Property | Description |
|---|---|
Prebake Collision Meshes | Adds collision data to Meshes at build time. |
Preloaded Assets | Sets an array of Assets for the player to load on startup. To add new Assets, increase the value of the Size property and then set a reference to the Asset to load in the new Element box that appears. |
Managed Stripping Level | Choose how aggressively Unity strips unused managed (C#) code. When Unity builds your app, the Unity Linker process can strip unused code from the managed DLLs your Project uses. Stripping code can make the resulting executable smaller, but can sometimes remove code that's in use. For more information about these options and bytecode stripping with IL2CPP, refer to ManagedStrippingLevel.
|
Managed Code Variant | Defines how C# code in the project is compiled when exporting a build. Each variant level is inclusive of the next level: for instance, the Debug variant has Unity checks enabled, whereas the Checked variant has Instrumented code paths enabled. The default variant is Release.
|
Vertex Compression | Sets vertex compression per channel. This affects all the meshes in your project. Typically, Vertex Compression is used to reduce the size of mesh data in memory, reduce file size, and improve GPU performance. For more information on how to configure vertex compression and limitations of this setting, refer to Compressing mesh data. |
Optimize Mesh Data | Enable this option to strip unused vertex attributes from the mesh used in a build. This option reduces the amount of data in the mesh, which can help reduce build size, loading times, and runtime memory usage. Warning: If you have this setting enabled, don't change material or shader settings at runtime. For more information, refer to PlayerSettings.stripUnusedMeshComponents. |
Texture Mipmap Stripping | Enables mipmap stripping for all platforms. It strips unused mipmap levels from Textures at build time. Unity determines unused mipmap levels by comparing the mipmap level against the quality settings for the current platform. If a mipmap level is excluded from every quality setting for the current platform, then Unity strips those mipmap levels from the build at build time. If |
Stack Trace
Select which type of stack trace logging to allow in specific contexts.

Stack Trace settings
Select your preferred stack trace method by enabling the option that corresponds to each Log Type (Error, Assert, Warning, Log, and Exception) based on the type of logging you require. For more information, refer to stack trace logging.
Property | Description |
|---|---|
| None | No logs are ever recorded. |
| ScriptOnly | Logs only when running scripts. |
| Full | Logs all the time. |
Legacy
Enable Clamp BlendShapes (Deprecated) to clamp the range of blend shape weights in SkinnedMeshRenderers.

Legacy settings
Publishing Settings
Use these settings to customize building your UWP app. These options are organized into the following groups:
- Packaging
- Certificate
- Application UI
- File and Protocol Associations
- Misc
- Capabilities
- Supported Device Families
Unity stores these settings in the file when creating a Visual Studio solution for the first time.
Package.appxmanifestFor more information, refer to Microsoft's documentation on App package manifest.
Supported orientations from Player Settings are also populated to the manifest ( file in Visual Studio solution). On UWP apps, Unity resets the orientation to the one you used in the Player settings, regardless of what you specify in the manifest. This is because Windows itself ignores those settings on desktop and tablet computers.
Package.appxmanifestPackaging
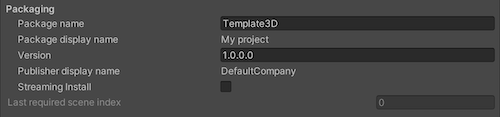
Packaging settings
Property | Description |
|---|---|
| Package name | Enter the name to identify the package on the system. The name must be unique. |
| Package display name | The Product Name value that you set at the top of the Player settings appears here. This is the name of the app as it will appear on the Microsoft Store. |
| Version | Enter the version for the package using a string in quad notation: Major.Minor.Build.Revision. |
| Publisher display name | The Company Name value that you set at the top of the Player settings appears here. This is the user-friendly name of the publisher. |
| Streaming Install | Enable this option to create a |
| Last required scene index | Enter the index number from the Scenes In Build list on the Build Profiles window that corresponds to the last scene in that list that must be present in the game build. For an application to start, Unity requires any scene index at or less than the specified index. To require all files in the list, use the index of the last scene in the list. Scenes with a greater scene index must include shared Assets for Scenes with a lesser index. The order of scenes in the Build Profiles dialog may be important to allow the application to locate the required assets. Note: By default, the Streaming Install option is disabled, which means that this setting isn't available. To make this property editable, enable the Streaming Install option first. |
Certificate
Every UWP app needs a certificate which identifies a developer. Use these settings to select a certificate file saved on your computer or create one if it isn't already available.

Certificate settings before and after creating a certificate
Property | Description |
|---|---|
Publisher | Displays the name of the package publisher. For example, |
Issued by | Displays the issuer name of the package. This is the same as the publisher name you enter in the Publisher setting. |
Expiration date | Displays the certificate expiry date which is set to one year from the time the certificate is created. |
Select | Allows you to choose your certificate file ( |
Create | Allows you to create a certificate if you don’t have a certificate file already. When you select Create, the Create Test Certificate for Microsoft Store dialog window appears with the following fields.
|
Application UI
Use this section to provide the description for your app that will appear in the Microsoft Store. Unity copies these options directly to the file.
Package.appxmanifest
Application UI settings for UWP
Property | Description |
|---|---|
| Display name | Displays the Product Name value that you set at the top of the Player Settings window. This is the full name of the app. |
| Description | Enter the text you want to display on the app's tile on the Microsoft Store. By default, this is set to the Product Name value. |
File and Protocol Associations
The settings under the File Type Associations, File Types, and Protocol sections allow you to set up your Microsoft Store app as the default handler for a certain file type or URI scheme.
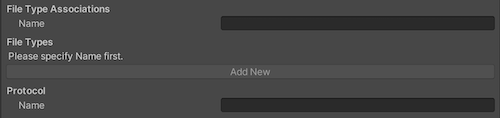
File Type Associations and Protocol section for UWP
File Type Associations setting
Property | Description |
|---|---|
| Name | Enter the name for a group of file types. These files share the same display name, logo, info tip, and edit flags. Choose a group name that can stay the same across app updates. Note: Use lowercase letters only. |
File Types settings
Property | Description |
|---|---|
Add New | Allows you to add multiple file types to set up a file association. To interact with this button, you need to specify the name for the file type group first. When you select Add New, the following properties are displayed.
|
Protocol setting
Property | Description |
|---|---|
| Name | Enter a protocol name to set up an association with a URI scheme. |
For more information, refer to Microsoft documentation on Auto-launching with file and URI associations (XAML).
Misc
Unity receives input by subscribing to events. The Input Source setting defines where (which sources) to get input from. Currently this only applies to mouse and touch input, as keyboard input always comes from CoreWindow.

Misc settings for UWP
Property | Description |
|---|---|
Default Language (.vcxproj) | Sets the XML default language in the generated Visual Studio project. If not specified, ‘en-US’ is used. Note: Changes only apply to the initial file generation, changes don’t affect pre-existing files. |
Input Source | Defines which sources to receive input from. Currently this only applies to mouse and touch input, as keyboard input always comes from CoreWindow.
|
Capabilities
Use the Capabilities section to enable APIs or resources you want your app to access. These could be pictures, music, or devices such as the camera or the microphone.
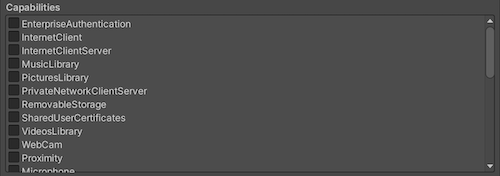
Capabilities settings for UWP
Property | Description |
|---|---|
| EnterpriseAuthentication | Windows domain credentials enable a user to log into remote resources using their credentials, and act as if a user provided their username and password. |
| InternetClient | Allows your app to receive incoming data from the Internet. Can't act as a server. No local network access. |
| InternetClientServer | Same as InternetClient but also enables peer-to-peer (P2P) scenarios where the app needs to listen for incoming network connections. |
| MusicLibrary | Accesses the user's Music, allowing the app to enumerate and access all files in the library without user interaction. This capability is typically used in jukebox apps that make use of the entire Music library. |
| PicturesLibrary | Accesses the user's Pictures, allowing the app to enumerate and access all files in the library without user interaction. This capability is typically used in photo apps that make use of the entire Pictures library. |
| PrivateNetworkClientServer | Provides inbound and outbound access to home and work networks through the firewall. This capability is typically used for games that communicate across the local area network (LAN), and for apps that share data across a variety of local devices. |
| RemovableStorage | Accesses files on removable storage, like USB keys and external hard drives. |
| SharedUserCertificates | Allows your app to add and access software and hardware-based certificates in the Shared User store, such as certificates stored on a smart card. This capability is typically used for financial or enterprise apps that require a smart card for authentication. |
| VideosLibrary | Accesses the user's Videos, allowing the app to enumerate and access all files in the library without user interaction. This capability is typically used in movie-playback apps that make use of the entire Videos library. |
| WebCam | Accesses the video feed of a built-in camera or external webcam, which allows the app to capture photos and videos. Note: This only grants access to the video stream. In order to grant access to the audio stream as well, the Microphone capability must be added. |
| Proximity | Enables multiple devices in close proximity to communicate with one another. This capability is typically used in casual multi-player games and in apps that exchange information. Devices attempt to use the communication technology that provides the best possible connection, including Bluetooth, Wi-Fi, and the Internet. |
| Microphone | Accesses the microphone’s audio feed, which allows the app to record audio from connected microphones. |
| Location | Accesses location functionality that retrieved from dedicated hardware like a GPS sensor in the PC or derived from available network info. |
| HumanInterfaceDevice | Enables access to Human Interface Device APIs. For more information, refer to How to specify device capabilities for HID. |
| AllJoyn | Allows AllJoyn-enabled apps and devices on a network to discover and interact with each other. |
| BlockedChatMessages | Allows apps to read SMS and MMS messages that have been blocked by the Spam Filter app. |
| Chat | Allows apps to read and write all SMS and MMS messages. |
| CodeGeneration | Allows apps to access the following functions which provide JIT capabilities to apps |
| Objects3D | Allows apps to have programmatic access to the 3D object files. This capability is typically used in 3D apps and games that need access to the entire 3D objects library. |
| PhoneCall | Allows apps to access all of the phone lines on the device and perform the following functions. Place a call on the phone line and display the system dialer without prompting the user. Access line-related metadata. Access line-related triggers. Allows the user-selected spam filter app to set and check block list and call origin information. |
| UserAccountInformation | Accesses the user's name and picture. |
| VoipCall | Allows apps to access the VOIP calling APIs in the Windows.ApplicationModel.Calls namespace. |
| Bluetooth | Allows apps to communicate with already paired bluetooth devices over both Generic Attribute (GATT) or Classic Basic Rate (RFCOMM) protocol. |
| SpatialPerception | (Deprecated) Provides programmatic access to spatial mapping data, giving mixed reality apps information about surfaces in application-specified regions of space near the user. Declare the spatialPerception capability only when your app will explicitly use these surface meshes, as the capability isn't required for mixed reality apps to perform holographic rendering based on the user’s head pose. |
| InputInjectionBrokered | Allows apps to inject various forms of input such as HID, touch, pen, keyboard or mouse into the system programmatically. This capability is typically used for collaboration apps that can take control of the system. |
| Appointments | Accesses the user’s appointment store. This capability allows read access to appointments obtained from the synced network accounts and to other apps that write to the appointment store. With this capability, your app can create new calendars and write appointments to calendars that it creates. |
| BackgroundMediaPlayback | Changes the behavior of the media-specific APIs like the MediaPlayer and AudioGraph classes to enable media playback while your app is in the background. All active audio streams will no longer mute, but will continue to be audible when an app transitions to the background. Additionally, app lifetime will be extended automatically while playback is occurring. |
| Contacts | Accesses the aggregated view of the contacts from various contacts stores. This capability gives the app limited access (network permitting rules apply) to contacts that were synced from various networks and the local contact store. |
| LowLevelDevices | Allows apps to access custom devices when a number of additional requirements are met. |
| OfflineMapsManagement | Allows apps to access offline maps. |
| PhoneCallHistoryPublic | Allows apps to read cellular and some VOIP call history information on the device. This capability also allows the app to write VOIP call history entries. |
| PointOfService | Enables access to APIs in the Windows.Devices.PointOfService namespace. This namespace lets your app access Point of Service (POS) barcode scanners and magnetic stripe readers. The namespace provides a vendor-neutral interface for accessing POS devices from various manufacturers from a UWP app. |
| RecordedCallsFolder | Allows apps to access the recorded calls folder. |
| RemoteSystem | Allows apps to have access to a list of devices associated with the user's Microsoft Account. Access to the device list is necessary to perform any operations that persist across devices. |
| SystemManagement | Allows apps to have basic system administration privileges such as shutting down or rebooting, locale, and timezone. |
| UserDataTasks | Allows apps to have access to the current state of the tasks setting. |
| UserNotificationListener | Allows apps to have access to the current state of the notifications setting. |
| GazeInput | Allows apps to detect where the user is looking when a compatible eye-tracking device is connected. |
For more information, refer to App capability declarations.
Unity copies these options directly to the file.
Package.appxmanifestSupported Device Families
A device family identifies the APIs, system characteristics, and behaviors across a class of devices. It also determines the set of devices on which your app can be installed from the Store. For more information, refer to Microsoft's Device families overview.
If no options are enabled, is used as default, which enables your app to be available on all device families. You can also set this within the API in instead of in the Editor.
Windows.UniversalPlayerSettings.WSATargetFamily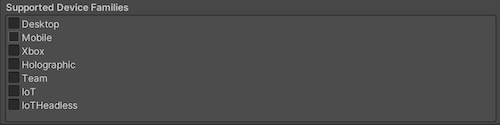
Supported Device Families settings for UWP
Property | Description |
|---|---|
| Desktop | Indicates whether your application supports the Desktop device family. |
| Mobile | Indicates whether your application supports the Mobile device family. |
| Holographic | (Deprecated) Indicates whether your application supports the HoloLens device family. |
| Team | Indicates whether your application supports the Team device family. This is commonly used for Microsoft Surface Hub devices. |
| IoT | Indicates whether your application supports the IoT device family. Note: Currently, apps targeting IoT aren't valid in the app store and should be used only for development purposes. |
| IoTHeadless | Indicates whether your application supports the IoTHeadless device family. Note: Currently, apps targeting IoTHeadless aren't valid in the app store and should be used only for development purposes. |
For more information, refer to Device family availability.