Create TreeView with IMGUI
Create custom tree views in the Editor.
Read time 14 minutesLast updated 25 days ago
The information on this page assumes the reader has basic knowledge of IMGUI (Immediate Mode GUI) concepts. For information about IMGUI and customizing Editor windows, refer to Extending the Editor and the IMGUI Unity blog.
TreeView is an IMGUI control used to display hierarchical data that you can expand and collapse. Use TreeView to create highly customizable list views and multi-column tables for Editor windows, which you can use alongside other IMGUI controls and components.
See Unity Scripting API documentation on TreeView for information about the available TreeView API functions.
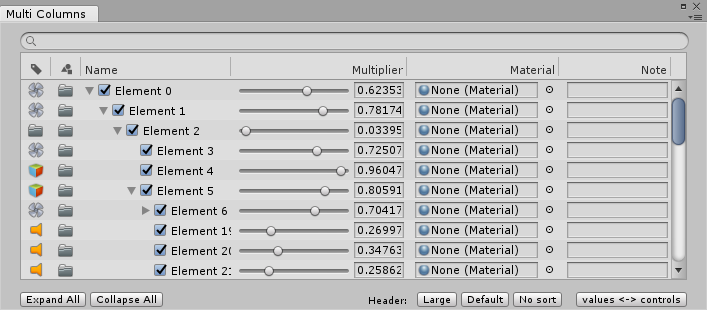
Example of a TreeView with a MultiColumnHeader and a SearchField.
Note that the TreeView is not a tree data model. You can construct TreeView using any tree data structure you prefer. This can be a C# tree model, or a Unity-based tree structure like the Transform hierarchy.
The rendering of the TreeView is handled by determining a list of expanded items called rows. Each row represents one . Each contains parent and children information, which is used by the TreeView to handle navigation (key and mouse input).
TreeViewItemTreeViewItemThe TreeView has a single root which is hidden and does not appear in the Editor. This item is the root of all other items.
TreeViewItemImportant classes and methods
The most important classes aside from the TreeView itself are TreeViewItem and TreeViewState.
TreeViewState (TreeViewState) contains state information that is changed when interacting with TreeView fields in the Editor, such as selection state, expanded state, navigation state, and scroll state. is the only state that is serializable. The TreeView itself is not serializable - it is reconstructed from the data that it represents when it is constructed or reloaded. Add the as a field in your -derived class to ensure that user-changed states are not lost when reloading scripts or entering Play mode (see documentation on extending the Editor for information on how to do this). For an example of a class containing a field, see Example 1: A simple TreeView, below.
TreeViewStateTreeViewStateEditorWindowTreeViewStateTreeViewItem (TreeViewItem) contains data about an individual TreeView item, and is used to build the representation of the tree structure in the Editor. Each must be constructed with a unique integer ID (unique among all the items in the TreeView). The ID is used for finding items in the tree for the selection state, expanded state, and navigation. If the tree represents Unity objects, use GetInstanceID for each object as the ID for the . The IDs are used in the to persist user-changed states (such as expanded items) when reloading scripts or entering Play mode in the Editor.
TreeViewItemTreeViewItemTreeViewStateAll have a property, which indicates the visual indentation. See the Initializing a TreeView example below for more information.
TreeViewItemsdepthBuildRoot (BuildRoot) is the single abstract method of the class that must be implemented to create a TreeView. Use this method to handle creating the root item of the tree. This is called every time Reload is called on the tree. For simple trees that use small data sets, create the entire tree of under the root item in . For very large trees, it is not optimal to create the entire tree on every reload. In this situation, create the root and then override the method to only create items for the current rows. For an example of in use, see Example 1: A simple TreeView below.
TreeViewTreeViewItemsBuildRootBuildRowsBuildRootBuildRows (BuildRows) is a virtual method where the default implementation handles building the rows list based on the full tree created in . If only the root was created in , this method should be overridden to handle the expanded rows. See Initializing a TreeView, below, for more information.
BuildRootBuildRoot
Summary of the order and repetition of the BuildRoot and BuildRows event methods.
This diagram summarizes the ordering and repetition of and event methods during a TreeView’s lifetime. Note that the method is called once every time is called. is called more often because it is called once on (right after ) and every time is expanded or collapsed.
BuildRootBuildRowsBuildRootReloadBuildRowsReloadBuildRootTreeViewItemInitializing a TreeView
The TreeView is initialized when the method is called from a TreeView object.
ReloadThere are two ways to set up a TreeView:
-
Create the full tree - Creates for all items in the tree model data. This is the default and requires less code to set up. The full tree is built when BuildRoot is called from a TreeView object.
TreeViewItem -
Create only the expanded items - This approach requires you to overrideto manually control the rows being shown, and
BuildRowsis only used to create the rootBuildRoot. This approach scales best with large data sets or data that changes often.TreeViewItem
Use the first approach for small data sets, or for data that does not change often. Use the second approach for large data sets, or data that changes often, because it is faster to only create only expanded items rather than a full tree.
There are three ways you can set up TreeViewItems:
-
Creates with children, parent, and depths initialized from the start.
TreeViewItem -
Creates with parent and children and then use SetupDepthsFromParentsAndChildren to set the depths.
TreeViewItem -
Creates only with depth information and then use SetupDepthsFromParentsAndChildren to set the the parent and children references.
TreeViewItem
Examples
To view the Project and source code for the examples shown below, download TreeViewExamples.zip.
Example 1: A simple TreeView
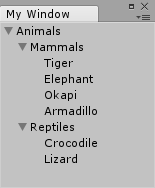
An example of a simple hierarchy using animals as placeholder names.
To create a TreeView, create a class that extends the class and implement the abstract method . The following example creates a simple TreeView.
TreeViewBuildRootclass SimpleTreeView : TreeView{ public SimpleTreeView(TreeViewState treeViewState) : base(treeViewState) { Reload(); } protected override TreeViewItem BuildRoot () { // BuildRoot is called every time Reload is called to ensure that TreeViewItems // are created from data. Here we create a fixed set of items. In a real world example, // a data model should be passed into the TreeView and the items created from the model. // This section illustrates that IDs should be unique. The root item is required to // have a depth of -1, and the rest of the items increment from that. var root = new TreeViewItem {id = 0, depth = -1, displayName = "Root"}; var allItems = new List<TreeViewItem> { new TreeViewItem {id = 1, depth = 0, displayName = "Animals"}, new TreeViewItem {id = 2, depth = 1, displayName = "Mammals"}, new TreeViewItem {id = 3, depth = 2, displayName = "Tiger"}, new TreeViewItem {id = 4, depth = 2, displayName = "Elephant"}, new TreeViewItem {id = 5, depth = 2, displayName = "Okapi"}, new TreeViewItem {id = 6, depth = 2, displayName = "Armadillo"}, new TreeViewItem {id = 7, depth = 1, displayName = "Reptiles"}, new TreeViewItem {id = 8, depth = 2, displayName = "Crocodile"}, new TreeViewItem {id = 9, depth = 2, displayName = "Lizard"}, }; // Utility method that initializes the TreeViewItem.children and .parent for all items. SetupParentsAndChildrenFromDepths (root, allItems); // Return root of the tree return root; }}
In this example, depth information is used to build the TreeView. Finally, a call to sets the parent and children data of the s.
SetupDepthsFromParentsAndChildrenTreeViewItemNote that there are two ways to set up the : Set the parent and children directly, or use the method, as demonstrated in the following example:
TreeViewItemAddChildprotected override TreeViewItem BuildRoot(){ var root = new TreeViewItem { id = 0, depth = -1, displayName = "Root" }; var animals = new TreeViewItem { id = 1, displayName = "Animals" }; var mammals = new TreeViewItem { id = 2, displayName = "Mammals" }; var tiger = new TreeViewItem { id = 3, displayName = "Tiger" }; var elephant = new TreeViewItem { id = 4, displayName = "Elephant" }; var okapi = new TreeViewItem { id = 5, displayName = "Okapi" }; var armadillo = new TreeViewItem { id = 6, displayName = "Armadillo" }; var reptiles = new TreeViewItem { id = 7, displayName = "Reptiles" }; var croco = new TreeViewItem { id = 8, displayName = "Crocodile" }; var lizard = new TreeViewItem { id = 9, displayName = "Lizard" }; root.AddChild(animals); animals.AddChild(mammals); animals.AddChild(reptiles); mammals.AddChild(tiger); mammals.AddChild(elephant); mammals.AddChild(okapi); mammals.AddChild(armadillo); reptiles.AddChild(croco); reptiles.AddChild(lizard); SetupDepthsFromParentsAndChildren(root); return root;}
Alternative BuildRoot
method for the SimpleTreeView
class above
BuildRootSimpleTreeViewThe following example shows the that contains the . TreeViews are constructed with a instance. The implementer of the TreeView should determine how this view state should be handled: whether its state should persist until the next session of Unity, or whether it should only preserve its state after scripts are reloaded (either when entering Play mode or recompiling scripts). In this example, the is serialized in the , ensuring the TreeView preserves its state when the Editor is closed and reopened.
EditorWindowSimpleTreeViewTreeViewStateTreeViewStateEditorWindowusing System.Collections.Generic;using UnityEngine;using UnityEditor.IMGUI.Controls;class SimpleTreeViewWindow : EditorWindow{ // SerializeField is used to ensure the view state is written to the window // layout file. This means that the state survives restarting Unity as long as the window // is not closed. If the attribute is omitted then the state is still serialized/deserialized. [SerializeField] TreeViewState m_TreeViewState; //The TreeView is not serializable, so it should be reconstructed from the tree data. SimpleTreeView m_SimpleTreeView; void OnEnable () { // Check whether there is already a serialized view state (state // that survived assembly reloading) if (m_TreeViewState == null) m_TreeViewState = new TreeViewState (); m_SimpleTreeView = new SimpleTreeView(m_TreeViewState); } void OnGUI () { m_SimpleTreeView.OnGUI(new Rect(0, 0, position.width, position.height)); } // Add menu named "My Window" to the Window menu [MenuItem ("TreeView Examples/Simple Tree Window")] static void ShowWindow () { // Get existing open window or if none, make a new one: var window = GetWindow<SimpleTreeViewWindow> (); window.titleContent = new GUIContent ("My Window"); window.Show (); }}
Example 2: A multi-column TreeView
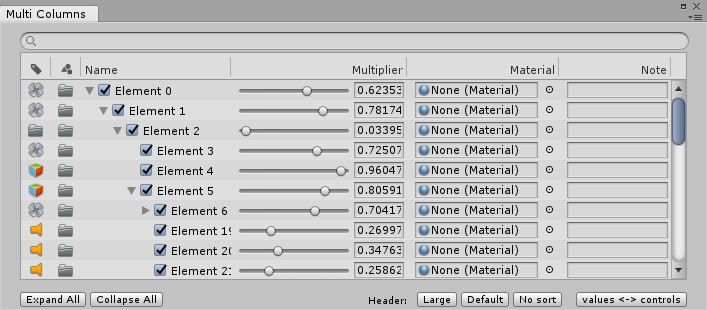
Example of a hierarchy with different columns.
This example illustrates a multi-column TreeView that uses the MultiColumnHeader class.
MultiColumnHeaderThis example creates a data model using the classes and . The TreeView fetches data from this "TreeModel". In this example, the and classes have been built in to demonstrate the features of the TreeView class. These classes have been included in the TreeView Examples Project (TreeViewExamples.zip). The example also shows how the tree model structure is serialized to a ScriptableObject and saved in an Asset.
TreeElementTreeModelTreeElementTreeModel[Serializable]//The TreeElement data class is extended to hold extra data, which you can show and edit in the front-end TreeView.internal class MyTreeElement : TreeElement{ public float floatValue1, floatValue2, floatValue3; public Material material; public string text = ""; public bool enabled = true; public MyTreeElement (string name, int depth, int id) : base (name, depth, id) { floatValue1 = Random.value; floatValue2 = Random.value; floatValue3 = Random.value; }}
The following ScriptableObject class ensures that data persists in an Asset when the tree is serialized.
[CreateAssetMenu (fileName = "TreeDataAsset", menuName = "Tree Asset", order = 1)]public class MyTreeAsset : ScriptableObject{ [SerializeField] List<MyTreeElement> m_TreeElements = new List<MyTreeElement> (); internal List<MyTreeElement> treeElements { get { return m_TreeElements; } set { m_TreeElements = value; } }}
Construction of the MultiColumnTreeView class
The following example shows snippets of the class , which illustrates how the multi column GUI is achieved. Find full source code in the TreeView Examples Project (TreeViewExamples.zip).
MultiColumnTreeViewpublic MultiColumnTreeView (TreeViewState state, MultiColumnHeader multicolumnHeader, TreeModel<MyTreeElement> model) : base (state, multicolumnHeader, model){ // Custom setup rowHeight = 20; columnIndexForTreeFoldouts = 2; showAlternatingRowBackgrounds = true; showBorder = true; customFoldoutYOffset = (kRowHeights - EditorGUIUtility.singleLineHeight) * 0.5f; extraSpaceBeforeIconAndLabel = kToggleWidth; multicolumnHeader.sortingChanged += OnSortingChanged; Reload();}
The custom changes in the code sample above make the following adjustments:
-
: Change the default height (which is based on EditorGUIUtility.singleLineHeight’s 16 points) to 20, to add more room for GUI controls.
rowHeight = 20 -
: In the example, the fold-out arrows are shown in the third column because this value is set to 2 (see image above). If this value is not changed, the fold-outs are rendered in the first column, because "columnIndexForTreeFoldouts" is 0 by default.
columnIndexForTreeFoldouts = 2 -
: Enable alternating row background colors, so that each row is distinct.
showAlternatingRowBackgrounds = true -
: Render the TreeView with a margin around it, so that a thin border is shown to delimit it from the rest of the content
showBorder = true -
: Center fold-outs vertically in the row - see Customizing the GUI below.
customFoldoutYOffset = (kRowHeights - EditorGUIUtility.singleLineHeight) * 0.5f -
: Make space before the tree labels so the toggle button is shown.
extraSpaceBeforeIconAndLabel = 20 -
: Assign a method to the event to detect when the sorting changes in the header component (when the header column is clicked), so that the rows of the TreeView change to reflect the sorting state.
multicolumnHeader.sortingChanged += OnSortingChanged
Customizing the GUI
If the default RowGUI handling is used, the TreeView looks like the example above, with only fold-outs and a label. When using multiple data values for each item, you must override the RowGUI method to visualize these values.
SimpleTreeViewprotected override void RowGUI (RowGUIArgs args)
The following code sample is the argument structure of the struct.
RowGUIArgsprotected struct RowGUIArgs{ public TreeViewItem item; public string label; public Rect rowRect; public int row; public bool selected; public bool focused; public bool isRenaming; public int GetNumVisibleColumns () public int GetColumn (int visibleColumnIndex) public Rect GetCellRect (int visibleColumnIndex)}
You can extend the and add additional user data (which creates a class that derives from ). You can then use this user data in the RowGUI callback. An example of this is provided below. See - this example casts the input item to .
TreeViewItemTreeViewItemoverride void RowGUITreeViewItem<MyTreeElement>There are three methods which are related to column handling: GetNumVisibleColumns, GetColumn, and GetCellRect. You can only call these when the TreeView is constructed with a MultiColumnHeader, otherwise an exception is thrown.
protected override void RowGUI (RowGUIArgs args){ var item = (TreeViewItem<MyTreeElement>) args.item; for (int i = 0; i < args.GetNumVisibleColumns (); ++i) { CellGUI(args.GetCellRect(i), item, (MyColumns)args.GetColumn(i), ref args); }}
void CellGUI (Rect cellRect, TreeViewItem<MyTreeElement> item, MyColumns column, ref RowGUIArgs args){ // Center the cell rect vertically using EditorGUIUtility.singleLineHeight.// This makes it easier to place controls and icons in the cells. CenterRectUsingSingleLineHeight(ref cellRect); switch (column) { case MyColumns.Icon1: // Draw custom textureGUI.DrawTexture(cellRect, s_TestIcons[GetIcon1Index(item)], ScaleMode.ScaleToFit); break; case MyColumns.Icon2://Draw custom texture GUI.DrawTexture(cellRect, s_TestIcons[GetIcon2Index(item)], ScaleMode.ScaleToFit); break; case MyColumns.Name: // Make a toggle button to the left of the label text Rect toggleRect = cellRect; toggleRect.x += GetContentIndent(item); toggleRect.width = kToggleWidth; if (toggleRect.xMax < cellRect.xMax) item.data.enabled = EditorGUI.Toggle(toggleRect, item.data.enabled); // Default icon and label args.rowRect = cellRect; base.RowGUI(args); break; case MyColumns.Value1:// Show a Slider control for value 1 item.data.floatValue1 = EditorGUI.Slider(cellRect, GUIContent.none, item.data.floatValue1, 0f, 1f); break; case MyColumns.Value2:// Show an ObjectField for materials item.data.material = (Material)EditorGUI.ObjectField(cellRect, GUIContent.none, item.data.material, typeof(Material), false); break; case MyColumns.Value3:// Show a TextField for the data text string item.data.text = GUI.TextField(cellRect, item.data.text); break; }}
TreeView FAQ
Q: In my TreeView subclass, I have the functions BuildRoot and RowGUI. Is called for every that got added in the build function, or only for items that are visible on screen in the scroll view?
RowGUITreeViewItemA: is only called for the items visible on screen. For example, if you have 10,000 items, only the 20 visible items on screen have their called.
RowGUIRowGUIQ: Can I get the indices of the rows that are visible on the screen?
A: Yes. Use the method GetFirstAndLastVisibleRows.
Q: Can I get the list of rows that are built in BuildRows?
A: Yes. Use the method GetRows.
Q: Is it mandatory for any of the overridden functions to call ?
base.MethodA: Only if the method has a default behavior you want to extend.
Q: I just want to make list of items (not a tree). Do I have to create the root?
A: Yes, you should always have a root. You can create the root item and set for fast setup.
root.children = rowsQ: I’ve added a Toggle to my row - why doesn’t the selection jump to that row when I click on it?
A: By default, the row is only selected if the mouse down is not consumed by the contents of the row. Here, your Toggle consumes the event. To fix this, use the method SelectionClick before your Toggle button is called.
Q: Are there methods I can use before or after all methods are called?
RowGUIA: Yes. See API documentation on BeforeRowsGUI and AfterRowsGUI.
Q: Is there a simple way to return key focus to the TreeView from API? If I select a FloatField in my row, the row selection becomes gray. How do I make it blue again?
A: The blue color indicates which row currently has key focus. Because the FloatField has focus, the TreeView loses focus, so this is the intended behavior. Set when needed.
GUIUtility.keyboardControl = treeViewControlIDQ: How do I convert from to a ?
idTreeViewItemA: Use either FindItem or FindRows.
Q: How do I receive a callback when a user changes their selection in the TreeView?
A: Override the SelectionChanged method (other useful callbacks: DoubleClickedItem, and ContextClickedItem).